Showing posts with label kids clothes. Show all posts

Tuesday, April 15, 2014

Upcycling clothes, a sweatshirt to a little girls dress tutorial

Whilst browsing a local charity shop a few weeks ago , I came across a "Daisy Duck" sweatshirt for 25p , perfect for my little girl except that it was an age 11 yrs not age 5 yrs. Not wanting this bargain to get away I bought it anyway and set about upcycling it from a lovely sweatshirt to a little girls dress.
Here is the tutorial on how I did it to give you ideas on how you too can upcycle clothes easily and cheaply.


First grab your sweatshirt 


Use your seam ripper to de-tatch the sleeves 


Next grab your child that the dress needs to fit and place the de-armed sweatshirt over their head inside out as though it were a dress already.

Carefully place pins along one side of the sweatshirt to pin the sides of the sweatshirt to narrow them where neccessary to create a dress shape rather than a sack , also pin the armhole to create a smaller gap but make sure your child can still comfortably get their arm in and out of the armhole.
You may need to take the armholes in as well but I didn't need to for mine. If you need to use the same principle as for the dress sides pin in place but allow an extra 1/4 inch seam allowance for hemming the armholes. 
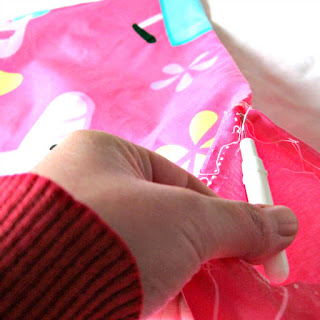
Either cover your hands over the pins to prevent them sticking in the child when you remove the sweatshirt or draw a line where your pins are and remove them first.
Ignore my drawn line below I changed my mind on the sizing before sewing.


Fold your sweatshirt down the middle and trace your dress shape you have just pinned onto the other armhole and sweatshirt side, this ensures your dress is symmetrical.


Now use a ball point needle as your fabric is probably a bit stretchy and a stretch stitch on your sewing machine and turn your armhole raw edges over 1/4 inch from the right side to the wrong side and sew all the way around both armholes 


Now sew on both sides of your sweatshirt following your guidelines you pinned earlier , a line of stitches starting at the armhole and following your line along to the side seam.
Do not cut this yet


Try the dress on the child first before any of this snippy snippy business, once you have cut it there is no going back, remember measure twice cut once.
Once you are happy that your dress fits then cut the excess fabric off the side where you have just sewn, leave about an 1/8 inch excess fabric next to your stitches and zig zag with a small zig zag stitch to neaten the edges .

And you have an easy 20 minute upcycled little girls dress.


Tuesday, July 16, 2013

Girls dress tutorial using jersey fabric with a butterfly motif

Well last week , my daughter came home with a dreaded letter from school, to say they are having a mini beast day and they could dress up as a mini beast for the day, unfortunately my daughter had also been told about this and had clearly spent her time since planning out the outfit that she was going to wear and mum being a sewer was going to magic one up. My girl being my girl, with her own ideas decided she was going to be a butterfly, now I am not sure if a butterfly technically qualifies as a mini beast, maybe some one could clarify for me, but who am I to argue with a five year old who has spent a day planning her dress.
With a bit of discussion we came up with the following dress, that could also be worn on other occasions to.

Girls jersey dress with butterfly motif

I have used a multicolour two way stretch jersey I already had, but you could use old t-shirts sewn together, any stretchy fabric will do . So here is how I made my butterfly dress.

Measurements needed are chest circumference measurement + 2 inches (example chest measurement 22 inches + 2 inches = 24 inches )
Armpit to waist measurement + 1 inch (example armpit to waist =10 inches + 1 inch = 11 inches )
Waist to knee length + 1 inch (Example waist to knee measures 14 inches + 1 inch = 15 inches )
Measurement over shoulder , armpit front to armpit back = 5 inches

First cut out 2 x chest pieces measuring chest + 2 inches divided by 2 this measurement needs to follow the stretch of the fabric so that it will stretch around the childs body x (Armpit to waist measurement + 1 inch)For my example each piece measures 12 inches x 11 inches
Then cut out 2 skirt pieces measuring (waist to knee + 1 inch) across the non stretchy direction of the fabric , and following the stretch of the fabric measure (Chest + 2 inches x 1 1/2 )divided by 2 , if you want a fuller skirt measure 2 x waist measurement for this dimension. In my example my skirt pieces measured 15 inches x 18 inches

Cut out 4 x strap pieces measuring over shoulder length measurement (along the stretch of the fabric), so shoulder straps will stretch over the shoulder x 3 inches
In my dress the strap pieces measured 5 inches x 3 inches


You will also want to cut a butterfly motif out of a contrasting piece of jersey fabric, to do this fold a piece of paper in half and draw half a butterfly shape against the fold and cut out, this gives you a symmetrical butterfly , use this cut out as a pattern for cutting your butterfly shape out. I find it easiest to pin on the fold and fold your paper butterfly back up and cut fabric as you did your paper butterfly.

You now need to pin your fabric butterfly to the front of your dress centrally ensuring your butterfly is flat against the dress front , you can fold your piece lengthways to centre up the butterfly as below

Girls dress tutorial bodice piece

And sew your butterfly to your front dress piece ensuring it is the correct way up using a small zig zag stitch along the edge of your butterfly, when your needle moves to the right it should land just over the raw edge of your butterfly.

You should end up with something like this


Girls dress butterfly motif

You now need to place both of your dress top pieces right sides together pinning in my case the shorter 11 inch length together on one side only and serge or sew and zig-zag to prevent fraying using a 5/8 inch seam allowance.

You will now have one length of fabric , next serge or zig-zag along the top of the dress top pieces and turn over 1/4 inch from right side to wrong side and zig-zag to create a stretchy hem.

You now need to sew the other short sides of your dress top together placing the pieces right side to right side again serge or sew and zig-zag with a 5/8 inch seam allowance so that you then have a tube .

Girls dress finished bodice piece

Follow the same steps for the skirt pieces again sew 2 pieces together to form one long length , sew the bottom hem and then sew together to form a tube , you will now have two tubes.

To sew the top and skirt together, turn your skirt with the wrong side facing out and the hem at the bottom, and place your top right side facing out hemmed top pushed downwards inside your skirt tube until the raw edges are lined up.
Find your side seams on your skirt and your top and pin the side seam on each side together , find the midpoint between the pins on your skirt and top and again pin together . you will now have 4 equally spaced pins.

Girls dress tutorial pieces

Gather your skirt piece evenly and pin to your top using as many pins as you need to hold it in place

Gathering skirt piece of girls dress

Serge or sew and zig-zag using a 5/8 inch seam allowance all around this raw edge you have just pinned, make sure you take your pins out as you go especially if serging. Sergers and pins do not make for a happy couple.

Turn your dress right side out , you are nearly done just need the straps, sew your strap pieces together sew two pieces together, right side to right side using 5/8 inch seam allowance along the long sides of the strips only to form a tube. Turn your tubes right side out , and turn the raw edges at the end of each tube inward and pin one strap at each side of the front of the dress equal distances from the side seams on the inside of the dress front , I measured on my daughter where these needed to go, for me the distance was 1 1/2 inches but this may be different for you, pin your strap pieces same distance apart on the back of the dress .

Sew the strap pieces on where you have pinned them and your dress is done. My butterfly ended up slightly wonky on my dress as unfortunately I had a problem with my serger and some of the dress got snarled up in it , long story short adjustments had to be made . My daughter is in love with the finished dress so its all good. Take a look and see what you think.

Girls dress with butterfly motif finished

If you like my little sew along tutorials I also sell them in my  Etsy shop e patterns , or if you enjoy the finished product but not so much the process of creating you can view my finished products for sale in my Etsy shop

Until next time , happy sewing

Tuesday, July 02, 2013

Quick, half hour sewing upcycling projects

I thought I would share with you a couple of really quick, upcycling projects, if your like me and have children , time is difficult to come by, sohere are a couple of easy upcycling ideas , each one could be completed in half an hour max, probably less, depending on how much detail you want and your sewing abilities, these projects would be suitable from beginner upward.

Project 1 , silly length jersey dress

First project I had this dress and found the length odd, neither here nor there

Womans dress upcycling


From this I created a tube dress and small shrug/cardigan as below

Upcycled woman skirtUpcycled womans top

Firstly I cut the dress across the middle, a couple of inches below the armpit , and serged along the top of the tube, if you haven't got a serger zig zag with your sewing machine (don't forget to use a ballpoint needle).

Create a waistband casing , as we did for the pillowcase skirt previously here using 1 inch thick elastic.
To measure the length of elastic you need, measure above your bust, around armpit level, this is where you want your dress to sit so use this length of elastic, and create the waistband casing and thread the elastic as per the pillowcase skirt tutorial and you have a dress.

For the shrug top, cut up the front middle of the top part of your dress through the neckline , serge or zig zag with your sewing machine all raw edges and trim with whatever you fancy, I had lace so I trimmed with lace but use what you have and let your imagination run wild, you can use buttons , bias binding or leave as it is and sew a hem

Project 2 a boys cardigan, to a girls cardigan


I have a little problem with hand me downs with my children, as my two little ones are a boy and a girl, my eldest tiddler being a boy and my youngest tiddler being a very girly girl who rocks the eclectic boho look , none of this dressing like her friends , she wants to be individual , so here is one way I achieve this, upcycling her brothers cardigan from this

Kids cardigan to be upcycled

to this

Upcycled childrens cardiganBoho chic recycled cardigan

A Boho Chic recycled cardigan no one else will be wearing


This again took less than half an hour , I cut out lace hearts from a scrap of net curtain I had , pinned and sewed them on the cardigan using raw edge applique, used zig zag stitch to sew the hearts around the edge to attach them to the cardigan and stop them fraying.

sewing lace hearts on a cardigan


Don't forget again if you are using a stretchy fabric, jersey or knit use a ballpoint needle.

Finally I added a ribbon trim around the bottom, by sewing with a straight stitch along the ribbon attaching it to the bottom of the cardigan.
You could upcycle a child's cardigan or a cardigan for yourself, make it as simple or as complicated as you like, add buttons , frills, lace , applique, or I quite like the idea of creating buttonholes and weaving ribbon through, maybe next time I will try this.

So get rooting through your wardrobe, your children's wardrobes, charity shops , car boot sales and friends wardrobes, what isn't worn ? can it be recycled into something that can be worn ?

There are so many ways to recycle and upcycle, here are a few items I have created that are for sale in my Etsy shop

Denim bag from recycled fabrics

Details here

Dolls quilt recycled fabrics

Details here

Handmade bunting recycled fabrics

Details here

Handmade recycled green wool bag

Details here

If you want to see other items I have created please visit www.martisanne.co.uk

Remember the only limit is your imagination, if you can imagine it, you can make it, until next time happy recycling


Tuesday, June 04, 2013

How to recycle a pillowcase in to a little girls skirt tutorial

This is a simple little sewing tutorial for making a little girl's skirt from a pillowcase, you know how I love a bargain and to recycle, well this is a combination of the two , suitable for a beginner sewer and upwards in 13 easy steps,the finished skirt would be suitable from approx. 0 to 6 years of age


You will need the following
A standard pillowcase 29 inches x 19 inches
A pair of scissors
Seam ripper
Thread to match your pillowcase

1 inch wide elastic, 1 inch longer than your child's waist measurement in my case I needed a 22 inch piece of elastic
The elastic, should preferably be non-roll elastic , but standard is fine if you don't have it.
A safety pin or bodkin to thread the elastic


So that you can turn this

Recycling a pillowcase to girls skirt supplies


Into this

Finished trecycled girls skirt

Step One

Measure the child's waist and add 1 inch , this is the length of elastic you will need in my case age 4-5 years 21nches + 1nch so cut 22 inch piece of elastic.
Measure from the child's waist to where you want the hem of the skirt to hit, in my case 17 inches long , then add 2 inches to this so 17 inches +2 inches =19 inches long.

Step Two


Lay your pillowcase on a flat surface with the long edge placed horizontally right side out , sewn edge to your left and open end to your right, measure along the top and bottom ,your waist measurement of your child, in my case 21 inches from the sewn edge toward the open end ,and mark with chalk or dressmakers pencil, join the marks and cut along this line see below, do not throw the smaller piece of fabric away you could use this for a scrunchie or hair bow, or I do have another idea brewing but need to try it out first

Lay pillowcase out to cut to size

Step Three

At this stage you will just have a shorter pillowcase, you will now need to get your seam ripper out and carefully open up the seams along both of the longer edges , you will then have one long piece of fabric in my case measuring 42 inches x 19 inches
Recycling a pillowcase top a girls skirt

Step Four

You will now need to serge along both of the long edges of the fabric, if you have one, if not set your sewing machine to a medium zig zag stitch and sew along both of the long edges of the fabric to prevent fraying, if you are zig-zagging remember to change your machine back to straight stitch after, I point this out as so many times I have forgotten and had just a tiny bit of a hissy fit .

Step Five

Fold over the fabric on both of these edges , 1/4 of an inch, folding in the fabric from the right side of the fabric to the wrong side and iron , this will give you a neat finish and will be easier to sew. Sew along both of the long edges with a straight stitch sewing 1/8 inch from your folded edge, to sew the hems you have just ironed down as shown below.

Hemming a girls skirt

Step Five a


If you are not using a serger , and zig-zagging your hems, use a zig-zag stitch to zig-zag along both of the shorter ends to prevent fraying, if you are using a serger carry on to the next step

Step Six

Now we are going to create the waistband casing

You now have one long length of fabric with top and bottom neatly hemmed , now place your fabric , long ends lying horizontally and wrong side of the fabric facing upwards with what will be the top of your skirt at the top. For this check your pattern on your pillowcase , some it won't matter , but in my case I wanted to make sure Peppa Pig was the right way up and not hanging from the ceiling.

Mark a line with a dressmakers pencil or chalk 1 1/2" inches down from your top edge the long side of the fabric,you need to iron along this line to iron the right side of the fabric over to the wrong side as shown below How to create a waistband casing for a skirt

Step Seven

Now you need to place your short ends together, with right sides facing , pin together from the bottom hem upwards, now this is the really important bit, when you get to the waist band casing you have just ironed, open it up and pin, do not pin with it folded over or you will regret it, you will never be able to thread your elastic through.
Now serge or sew , which ever you are using,a 5/8" seam, sewing the two short ends together to form a tube.

Step Eight

Turn your tube so that the right sides are facing outwards and fold your waistband casing you have ironed inwards going with your ironing fold, now place a pin on the wrong side of the fabric 1/2 inch away from the seam you have just sewn on either side you will see from the photo what I mean, these will be your markers for stopping and starting sewing so as to allow space to insert your elastic.
Continue to pin your elastic casing down with your pins in opposite direction to the first two.

Sewing a waistband casing shut

Finished waistband casing

Step Nine

Now you need to sew the waistband casing down using a straight stitch, sew along your hemmed edge, 1/4 of an inch in from your hemmed edge starting from one of your pins placed either side of the seam , sew all the way around to the other and stop at your pin on the other side of the seam, this will leave you a 1 inch gap to insert your elastic.

Step Ten

Cut your elastic, 1 inch longer than the waist measurement you require , you will need 1 inch wide flat elastic, I used non-roll which is preferable but not essential, if you just have standard then use that but be careful it doesn't twist when you are threading it through.
To thread your elastic through the waistband casing I use a safety pin pinned in one end, and push this into the casing through the gap you have left, using your pin to drag the elastic through , right around to the other side. The fabric will bunch up that's fine, just make sure you don't let the elastic pull all through the casing, make sure you have a 2 inch tail still showing as you will need to sew both ends together.


Threading elastic in a skirt waistband
Add caption


Step Eleven

Once you have threaded your elastic all the way around the waistband and you have two ends of elastic sticking out , safety pin them both together, so they don't disappear back inside your waistband never to be seen again. Now feel along the waistband to make sure your elastic is straight and has not twisted.
If it has, untwist it by working the twist along to the end of the elastic and unpinning the elastic ends and pin back together.
Now pull the elastic so you have about three inches of each end and overlap them by half an inch each so that they lay flat and the elastic remains untwisted

Sewing elastic waistband shut in a skirt


Step Twelve


Now sew a little square around the elastic where it overlaps using a small zig-zag stitch, you will need to use zig-zag to allow the elastic to stretch.
Pull the elastic back inside the skirt, you can do this by stretching the waistband and the elastic pops back in. Try the skirt if possible on the intended lucky little girl for fit, if it is a little loose you can cut a little off the elastic and re-sew it together. If it is a little tight you can cut the elastic and take it out and thread a longer piece through.

Step Thirteen

When you are sure the waist is the correct size, sew the inch gap closed on the waistband using a straight stitch


And your skirt is finished, 13 steps from pillowcase to skirt

Finished pillowcase skirt

I must apologise for the mysterious ghostly hand holding the levitating skirt, but my usual white screen is not available as we are currently building a Martisanne office/sewing room.
We tried it with my husband holding the hanger with his arm showing but they are large ,hairy and tattooed so did not really fit the look I was looking for with the little pink skirt or worse still you might think it was my arm !

Enjoy recycling your pillowcases you could make a whole wardrobe full for next to nothing, and they make great presents, until next time happy recycling !


Wednesday, May 01, 2013

Joggers to Shorts Upcycling tutorial

Well with a sniff of Summer last week I thought I had better get my skates on with the kids summer wardrobes. My middle son had outgrown a couple of pairs of jogging bottoms that were fine on the waist but were rapidly becoming "Harry half masts", I had to take them out of circulation to stop him wearing them so on the upcycling pile they went. Last week they were changed from the unwearable to wearable again with a little help from a pair of scissors and my sewing machine.
Here is how I did it.

1) First lay out your joggers or jeans or other trousers you want to cut down to shorts folded flat down the centre seam , with the crotch pulled out and make sure each leg and the crotch and waist band is lined up with each other so your legs end up the same length, as shown below

Joggers upcycling supplies


2) Use chalk or tailors chalk or a tailors pencil to mark the length you want your shorts to be, use an existing pair that fits if this helps and draw across the legs of the trousers, if you are not sure go longer they can always be cut shorter, but you can't stick it back on once you have cut it.

3) Mark another line 1 inch below this , this is the line you will cut along (this allows for a hem allowance), and cut as shown below, making sure everything is still lined up before you cut.
Joggers upcycling tutorial

4) Open up your shorts and look to see if they look even and if possible try them on the intended victim, remember they will be an inch longer approx than you want at the moment you need that for the hem allowance.

5) Now turn the cut off trousers inside out and iron the bottom edge up 1/2 inch and then 1/2 inch again and iron so that the raw edge is enclosed , you should have the first chalk mark now running along the bottom edge of the shorts.

6) Pin the ironed hem down and use a straight stitch and sew all around the bottom hem of the shorts using a 3/8 inch seam allowance, don't forget to use a jersey/ball point needle if using a stretchy fabric like jersey joggers.

7) Et voila new shorts
Finished upcycled shorts

You could skip the sewing part if you like, as denim frays and looks good this way, and jersey doesn't really fray ,if you do this cut along your first line,you won't need the extra inch for the hemline, but I prefer the neatness of hemming.

Although it's very tempting don't go cutting all your trousers down to shorts, or you will have very cold legs come Autumn and probably through the Summer too if you live in the UK.

LinkWithin

Related Posts Plugin for WordPress, Blogger...