Showing posts with label handmade. Show all posts

Tuesday, August 26, 2014

Vintage teddy bear, a crafty beginning

I wanted to share with you a little bit of my crafty beginnings. I always enjoyed making things as a child, and when I was about six or seven I had a compound fracture of my right wrist (both bones snapped falling off the top of a slide in case you are interested).
Due to this little incident I spent a couple of weeks in hospital with disgusting tasting antibiotics and a couple of operations to try and re-set my arm so despite being in hospital I was feeling relatively well  so pretty bored.
I had my teddy bear with me and I started making him paper clothes, sewing them together with the help of my mum with a needle and thread, this was the first time I remember doing something crafty outside of the usual painting and drawing.
I think teddy had more than a full wardrobe by the time I left the hospital.
Another memory I have of this time , sorry off on a tangent , was a boy that was in hospital at the time as me, who would have been I think maybe 15 or 16 at the time he lost his arm in a farm accident , I don't remember his name but I do remember he used to help the nurses bring toys and books around for the younger patients like me, he was always happy always smiling, despite what he had lost. It really does prove that people don't remember what you said or what you did necessarily but remember how you made them feel.
Back to teddy again, moving on a couple of years when I was  about eight years old my mum taught me how to knit and here is the proof , teddy who was given to me the day I was born wearing a scarf I knit for him over thirty years ago.


This teddy is a vintage soul, he is shall we say over thirty years old , and just look at that funky scarf I think I was inspired by Tom Baker as Dr. Who, I really was fascinated by that scarf.

And here is a close up of the handcrafted with love scarf, still going strong after all these years, proof that handmade really does last.
I haven't knitted for a long time , but look at all those colour changes, I had knitting talent then  and I am hoping I haven't lost it as I am going to have a go at knitting again , I had a little tinker with crochet last year and it has got me thinking about yarn again.
Don't worry I don't think anything will detract me from the sewing , you can find my sewings and doings in my Etsy shop, but if I can squeeze another few hours in the day I will hopefully get a little knitting done too.

Wednesday, July 30, 2014

Upcycling tiny fabric scraps and jewellery making

Follow">http://www.bloglovin.com/blog/12739685/?claim=fcmbs9hdkj4">Follow my blog with Bloglovin
A bit of an unscheduled blog post , but I am really excited about a new line I am creating in my shop so wanted to share, plus the vapours from the Epoxy glue may have infiltrated my brain.
I have started venturing into fabric jewellery making, yaaay, what's not to love fabric and jewellery combined.
If you follow me on Instagram you may have seen a few weeks ago I ordered some new supplies , pendant trays and cabochon glass tiles , only one type and size at the moment to see how things go, as being a small business I just can't afford the outlay of a 1000 different types of supplies , as much as I would love to.
This little foray started with a small piece of fabric I found in a charity shop, a lovely print with such pretty flowers but too small really to make much from but too pretty not to take home, so off it came with me, where I had this little idea of making it into jewellery , it's beauty forever frozen behind a glass tile.
So here is the story of my fabric pendants, first I gathered my supplies, you can see just how cute the fabric is and why I had to have it.

Fabric jewellery making supplies
Supplies at the ready

And a closer look at the floralicious fabrilicious flowers on the fabric.

Floral fabric for pendants
 
 
The pendants have been handmade by me , hand cutting the circle of card that backs the fabric, hand cutting and individually selecting the area of the fabric to go into the pendant.
 
The pendants are then constructed using a strong glue to bond all the layers together and you have the finished result , individual original floral fabric pendants , preserving that tiny scrap of fabric that would have ended up in the bin.

These pendants really show what my Etsy shop is about, handmade and constructed , and using up bits that would normally go to waste , upcycling and giving a tiny little scrap of fabric 1 inch in diameter a new lease of life.

These pendants will be available for sale in the shop shortly .

Floral fabric pendants
Finished pendants


Friday, July 18, 2014

Creating curves when sewing with french curves

Welcome to another little adventure in sewing land , I wanted to share with you a nifty little find, I found in our local recycling shop , not another one I hear you say !
I actually do pop into the recycling shop once a week if I can and I usually find something that I need / want, sometimes it is a combination of the two , like this week, have I kept you in suspense long enough ? This week it was tadaaaaa


French Curves for sewing
French Curves

French curves, now these as you can see from the photograph are the plastic type not the croissant type. These nifty plastic curves were brand new in the packet and I bought them for a princely sum of 20 pence .
That is all well and good I here you say, but what does it do ? I can tell you now it is doing it now, being all curvy. French curves are also known as dressmakers curves and draftsmen curves and probably have a 100 other names but those are the ones I have heard of .

French curves are just pieces of in this case plastic with a series of curves that can be used for drawing curves on drawings, sewing patterns and cutting fabrics etc.

I became in dire need of these little curves today when I discovered that I have lost the A line dress pattern that I had created for my daughter, since my daughter had already spotted the mermaid fabric to be upcycled there was nothing for it but to draw up a new pattern.

Luckily I found the dress I had made from the pattern, folded the dress in half lengthways , drew around it and added a seam allowance to create a new pattern.

Although I was not over the moon with the curve of the neckline or the curve of the sleeves from the tracing , so in came my french curves.

Using a french curve to draft an armhole

You can see from the photograph above I used the curve to create a nice evenly curved  armhole on the dress pattern , I just picked the curve that looked most suitable and lined it up and drew along the curve and cut the pattern. There was nothing technical to it just picked the curve that gave me the shape I wanted.

I also used a curve for the neck line , you can see from the photograph below

Using a french curve to create a neckline


Again nothing technical just use the curve that best suits your purpose . There may be a really technical way to go about drawing curves on sewing patterns when manually creating a pattern but this is the best way I have found.
If you don't have French curves , you can use objects that you have in the house, plates , cups, glasses , bowls , I admit to having used a dinner plate before and it did a fine job of creating a curve.

Please note I am not a trained seamstress, everything I have learned has been self taught and trial and error , so what I may be showing you may not be the "right" way but it is my way.

I thought I would also show you the finished mermaid dress created from an upcycled curtain that cost £3.00 from a charity shop , sorry it is not an amazing photograph, it was taken on my phone , and I can't get the dress of my daughter's back long enough to get a proper photograph, but you can get the gist from the picture, just a slip over the head A line dress , no zips or buttons , easy to wear my daughter's favourite type of dress and with the pattern ready to go it takes 30 minutes to make .
Upcycled girls mermaid dress


Saturday, July 05, 2014

A day at the Beach , Etsy Treasury created by Fashionelle Studio


Today my upcycled beach tote has been given the honour of being included in this beautiful Etsy treasury  yaaayyy , the treasury has been compiled by Fashionelle Studio, there are some really beautiful items in this treasury collection,  to see the treasury in full and comment and favourite items, and purchase , all items are available to purchase as this post went to press , click here

A Day At The Beach by Fashionelle on Etsy--Pinned with TreasuryPin.com

Tuesday, July 01, 2014

How to make a little girl's nightdress from a pillowcase tutorial

My little girl has been dying to have a nightdress like her grandma for ages , and I have hunted high and low but found it difficult to get hold of  a little girls proper nightdress at a reasonable cost , it is all pjs and t shirt nighties .
I don't know why I didn't think of this sooner but I decided to make my own, and forever thrifty bought two pillowcases for 99p from a charity shop to make some out of , and here is how I did it .

You will need a pillowcase

Pillowcases to recycle to a little girls nightdress


Scraps of fabric dependent on size of nightdress to be made
elastic trim
thread and scissors
ribbon (optional)

I will start by saying my daughter is 6 years old but quite a small 6 and these measurements are for her but you can adjust to fit.


                                                   This is what you will be making


Little girls nightdress made from a pillowcase


First you need to deconstruct your pillowcase , that flap bit that holds your pillows in we want to take that our you will need to cut along the fold line of the pillowcase , that is fine, keep your cut off though we need this.

Deconstructing pillowcase to make a little girls nightdress
And you see this hemmed edge on the opposite side to the flap we cut off , snip it off along the stitch line otherwise our final nightdress hem will be too bulky.

trimming hem from pillowcase

Snippety snip , now turn your pillowcase around and cut as close to the folded edge as you can right across the width of the pillowcase to open up the pillowcase into a tube.

creating a tube from the pillowcase
 
 
Jut a note at this point , if any of your side seams start to unravel, mine did , just sew them back up again at this point.


Next we need to create a hem at one end of the tube, fold your raw edge into the wrong side of the pillowcase 1/4 " and fold over again 1/4" enclosing the raw edge, pin in place and sew using a straight stitch, do this for one end only.

Folding hem of nightdress
 
Fold hem enclosing raw edge


I decided to sew some princess ribbon and ric rac around my hemline for decoration as my pillowcase was plain but it is entirely up to you what you do.

Next we are going to create the straps , grab your large piece of fabric that you removed from the inside of your pillowcase . I cut mine into two pieces measuring 9 1//2 inches x 4 inches , this was to make my straps 1 inch wide and I measured on my daughter , where I wanted  the nightdress to start on her chest and over her shoulder to the opposite point on her back and added 1 inch


To make the straps fold your fabric with the wrong side of the fabric facing up, in half lengthways and finger crease and open up, fold your long raw edges to this centre line so they meet then fold in half again enclosing the raw edges, open again and fold in the raw edges on your shorter sides by 1/4 inch to the wrong side of the fabric and fold up again along your crease lines and pin, you should have no raw edges protruding , do this for both straps.
Sew along all four sides of both straps using a straight stitch and 1/8 inch seam allowance.
I also sewed a strip of ribbon onto mine to jazz it up.

A note , if you don't have enough fabric from your pillowcase flap for the straps use another piece of scrap fabric that does fit.
 
sewing pillowcase nightdress straps


Next we need to attach the straps and hem the top off the nightdress , first measure where you want the straps to be set on the nightdress , measure your child for this but allow for the fact the nightdress top will be gathered , for my daughter the outside edge of the straps needed to be 4 inches in from the edge of the pillowcase so this is where I marked the pillowcase for strap placing on front and back of the pillowcase.
 
We are going to do as before for hemming this end of the pillowcase fold under 1/4" to wrong side but before folding again trap your strap in the fold and fold 1/4 inch again and pin in place, do this for the four strap positions , both ends of the two straps , and sew all the way around creating a hem using a straight stitch.
Attaching strap to pillowcase nightdress


attaching strap for pillowcase nightdress


Next we need to elasticate the top of the nightdress to stop it swinging around in the breeze, I used this , an elasticated trim
 
Elasticated trim
 
 
Measure your child's chest measurement and cut your elasticated trim to this size plus 1/2 inch, my daughter's was 24 inches so I cut the elastic to 24 1/2 inches .
Sew your elastic into a loop by overlapping the ends 1/2 inch, be careful not to twist it, your elastic will end up 1/2 inch smaller than your chest size.
 
Now we need pins , you are going to fold your elastic in half , with the sewn ends at one end, pin your seam to one of your side seams , on the outside of your pillowcase , the end with the straps and pin the folded end of elastic to the other side seam , so your elastic is distributed equally between side seams.
Next find the halfway spot on your elastic between these two points and pin it to your halfway point on your pillowcase between seams quartering your pillowcase and elastic, now gently pull and your elastic should stretch all round your pillowcase.
 
Switch your sewing machine to a zig zag stitch as we want the stitching to stretch with the elastic, and slowly sew the elastic to your hem , stretch your elastic gently as you go and you will see this gathers your nightdress top.
 
And you have your finished nightdress


An alternative for gathering the top of the nightdress is to make an elastic casing and thread elastic through , but for this example the elastic trim was quicker and I had it to hand .
Don't be put off by the length of this tutorial it took me longer to write it than make the nightdress, if I wasn't stopping to take photos, I could easily have had it done in half an hour , so a great thrifty and quick project.


Tuesday, June 17, 2014

Exciting new handmade creations and custom orders

Recently I have been looking at my Etsy shop again and looking to see where I can improve sales, and after doing this numerous times of doing tis and revamping the conclusion I have come to is I need to offer items that are as individual as the customer that is going to buy them.

I have been looking at new product ranges to give me that usp ( Unique selling point).

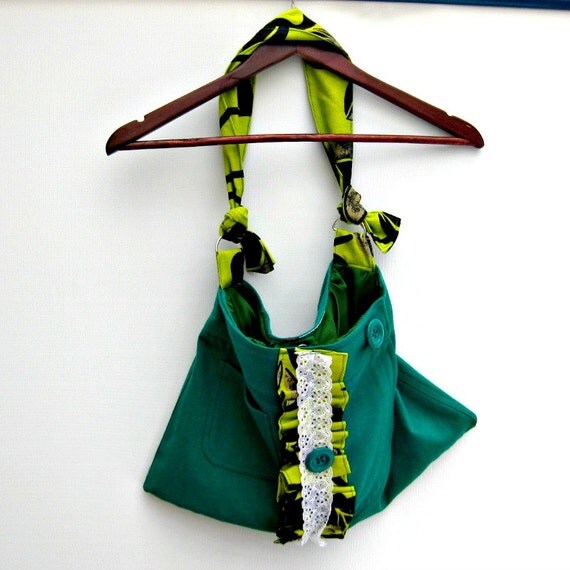
I generally used recycled fabrics to create items such as the bag below, that in itself is a little different but not truly unique


The first of these developments has been sewing patterns, I create my own when creating items for my shop, so partly as a record for me and in order to offer other people the opportunity to have a go at creating lovely items for themselves.

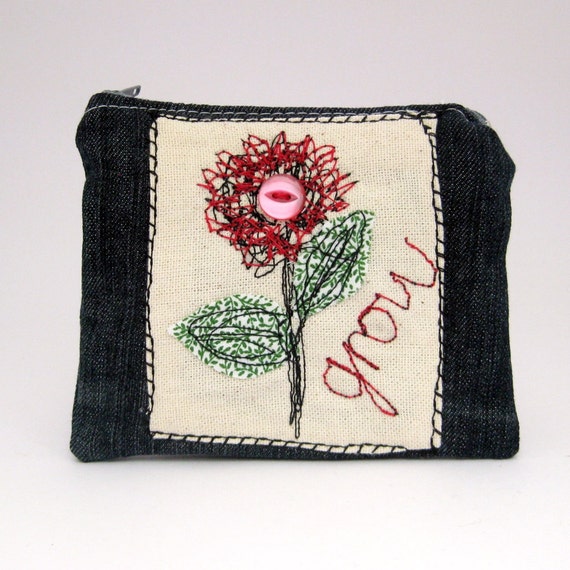
The second development for the shop is free motion embroidery items, now these are unique as I am drawing with the sewing machine, this in itself creates a unique product such as this purse.

Now that is unique enough I hear you say, well for me no, I always want to go that one step further, and thanks to a couple of enquiries regarding a product in my Etsy shop, I have decided to start offering custom orders, the custom orders option is now enabled in my Etsy shop .

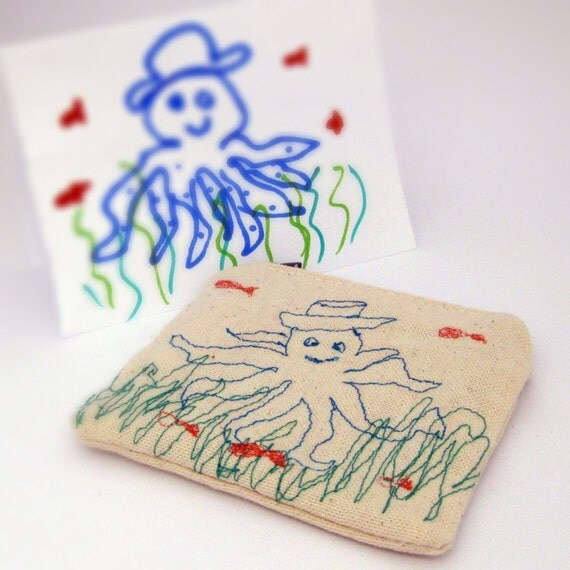
Here is the item that inspired the questions


A free motion embroidered octopus on a zip pouch, the drawing behind it is actually a quick sketch with a Sharpie that I did before embroidering the purse with the octopus design.
The questions I have been asked is can I do an embroidered purse from a child's picture, now this is truly a unique item, so in the next few weeks I will be setting up a custom listing for this purpose in my Etsy shop .
All designs will remain the property of the customer and will not be reproduced or used for advertising purposes without express agreement between you the customer and Martisanne Handmade.


Tuesday, June 03, 2014

A new member of the sewing team

You can see a picture of my sewing/crafting room in the sidebar, but here is a picture of where all the Martisanne Handmade Creations are made just in case you missed it.

Doesn't it look tidy ? , I can assure you at this present moment in time, it certainly does not look like this , sewers and crafty people are messy people it is in our nature , why get one fabric out when you can get out ten and ribbon and buttons and lace to go with it.

You can see the team there on the desk a Janome sewing machine and overlocker, which work just fine.
Recently though I have been doing a lot of free motion embroidery and sometimes finding with some thicker fabrics my Janome has struggled a little it is after all a domestic sewing machine not an industrial.
Another bugbear of mine was swapping from the darning foot to the standard foot, the darning foot is not clip on like the others but screw in, not difficult but when you just want to get on and create an extra step you could just do without.
So to counter these issues , meet the new member of the team "Jones"


Jones is an early birthday present from my husband, the plan is to leave one machine set up for embroidery the other for standard sewing.

It is not my birthday yet but I have been having a play with Jones and after initial hiccups and frustration of not threading him properly due to a lack of manual we are up and running.
I would say by the speed and power that Jones sews,  he is semi industrial , certainly weighs a tonne, I have Googled various Jones sewing machine images and not found one the same, and I cannot find a model number anywhere on the machine, I have looked underneath round the back, down the side , can anyone help me out ?, do you have one of these or have had one of these and know the model number, I would love to hear from you if you do.

Well toodlepip for now Jones and I are off to get up to some creative craftyness

Tuesday, May 13, 2014

How to make your own pin cushion from a face cream pot

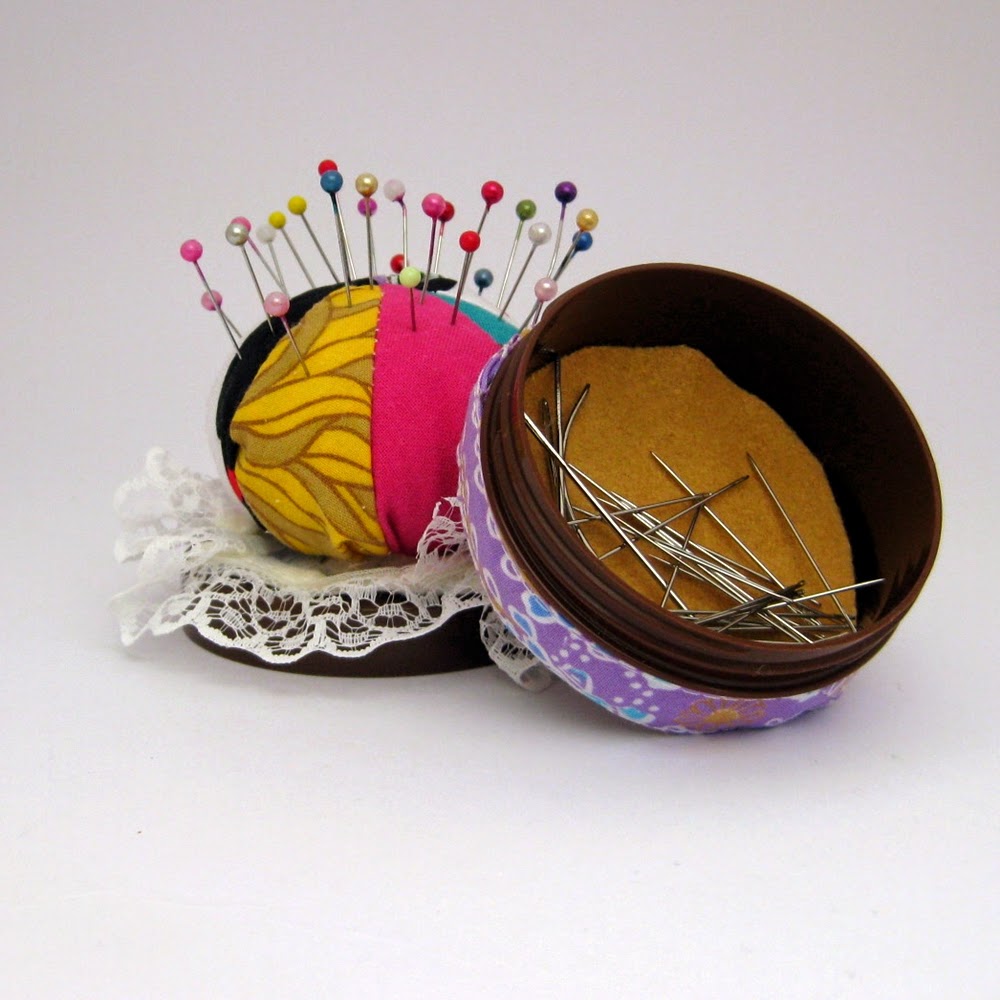
I have a nasty habit of leaving sewing pins and needles lying about in my office then moan that I can't find anything, so when one of my face creams ran out this week leaving me with a cute little plastic pot that I loathe to throw out , this got me thinking and the pincushion and storage pot for my needles came about.


To make a similar pin cushion you will need the following

Scissors
Paper
Pencil/pen
Empty plastic pot
Scraps of fabric 
Scraps of felt
lace trim (optional)
Scraps of quilt wadding or cushion stuffing (cheap option buy a really cheap cushion pad and use stuffing)
Hot glue gun


Gather your supplies and give your pot a good clean out and dry it, my pot was pre clean out , I was just loving the coconut smell at that point.


Use your pot base and lid to draw round and cut two pieces of felt in a circle , one for the base (mine was yellow) and one for the top, I used white for mine.


Put these felt circles to one side for the time being.

Next measure the diameter of your pot lid mine was (7cms).
For those that left  school a long time ago like me, the diameter is the measurement from one side of the circle to the other crossing the centre point.

You now need to draw a circle on your paper that is approximately 2 1/2 times the diameter of your pot lid, you can use a compass or like me you couldn't find it , I used a plate to draw around.


Cut your paper circle out


Yep my paper looks greasy, I used a bit the kids had grabbed with crisp fingers , waste not want not.

Fold your cut out circle in half, half again and half again , I have drawn on this one to show you where your fold lines will be, your circle will be divided into eight equal sections.


Fold your paper circle up again and use it as a template to cut out eight fabric shapes
Use different fabrics .


Now place one fabric piece on top of the other right sides facing and sew along the straight edge using a 1/4 inch seam allowance.


Carry on  and do this for all eight fabric circle segments and you will end up with a circle with a gap this is fine.


Next sew your two open edges together again right sides facing 1/4 inch seam allowance and sew slightly past the centre to make sure you have no hole in the centre, your fabric circle will be domed a bit like a bra cup, this is all good.


Turn your fabric circle over wrong side facing you and grab a needle and thread and sew a running stitch all the way around the outside.

Pull on one end of your stitches and gather it all together but leave a gap because we still need to add the stuffing.


Grab your quilt wadding or toy stuffing and stuff it in the gap to poof out your fabric circle, you want it quite firm so get as much in as you can.


When you have stuffed as much as you can, pull your threads tight and knot together trapping your stuffing in there.


I sewed a strip of lace edging around my felt circle for the pot lid , this is up to you if you want to add it or not.


Now grab your hot glue gun


And glue your felt circle for the lid and glue it down to the pot lid.
And glue your poofy stuffed circle of fabrics on top of the felt , gathered side down , press hard , you want it to sort of mushroom out a bit.


Glue your felt circle for your pot bottom into the bottom of your pot, sorry I forgot to take a shot of this .


I also glued a strip around the edge of my pot bottom from bias binding to jazz it up a bit, and there you have it a pincushion and sewing needle pot combo.


I hope you enjoyed this tutorial , if you enjoyed this you will love my sewing tutorials in my Etsy shop, if you can't be bothered making a purse, or bag or zip pouch and would like someone else to do all the hard work , I got that covered too, you can buy premade fabric gifts 

See you all soon .


LinkWithin

Related Posts Plugin for WordPress, Blogger...