Tuesday, June 18, 2013

Recycling t-shirts to a skater skirt

This tutorial was inspired by my husband having a wardrobe clearout, I always hover around to get first dibs scavenging buttons and any fabrics I can recycle ,so was really pleased when two t-shirts came my way. I really fancy having a jersey skater style skirt to go over leggings or to wear as is, for the 3 days of summer we have in the UK.
Here is what you will need:

A waist length of 2 inch deep elastic, whatever colour you choose as this will be your visible waistband
A couple of t-shirts to recycle of similar weight jerseys otherwise the skirt won't hang correctly, I used large men's , but whatever you have to hand that will yield enough fabric for your skirt fabric


recycling t-shirts to skater skirt supplies


First measure your waist size, we will call this measurement W and cut a piece of the two inch deep elastic to this size.
You will now need to measure from your waist to where on your leg you want the hem of the skirt to hit, we will call this measurement L
Grab your t-shirts and measure this length L from the hem up on your t-shirts as you will use this existing hem as the hem of your skirt and cut across your t-shirts you are using.

Cutting recycled t-shirts to size
The number of t-shirts you require will depend on your measurement W, that you have , you want roughly 11/2W plus 1 inch for every panel you add in, I will explain this in a minute.

After cutting your t-shirts you will have jersey tubes, cut down the side seams of your t-shirts so you now have panels of jersey.You are going to place your panels of jersey together , use the formula above to give you the size of panels you will need, have them all of equal size, have some skinnier than others, the choice is yours , as long as the width of your panels all add up to the formula above, and they are all the same length.
Just a note I tried with a larger width of fabric and it was too hard gathering it all together, so I found the above formula worked better.
Line all your panels up, and pin together right side to right side, line them all up so that the hems are all even , as you want the hem to be even on your skirt.

You are now going to sew all your panels together to form a tube, I used a serger, but if you are using a sewing machine, you will need to use a ballpoint needle for jersey and sew with a 5/8" seam allowance, and zigzag the edge for a finished look.

You will now have a jersey tube, now you need to either serge or zigzag along the top edge of your jersey tube, opposite end to the hem.

Now we need to create the waistband, grab your length of 2 inch elastic and sew it together to form a loop, using a 3/8" seam allowance, making sure there are no twists, open out the seam allowance flat and sew down the seam allowance with a zigzag stitch as shown below, this is the inside of your waistband.

Sewing elastic waistband of skirt

Now you need toile your waistband flat on the table, with your stitched end at one end, right side out and lie your jersey tube under it right side out , you are going to pin your tube at either end of the waistband with approx. 5/8"of the jersey fabric on the bottom inside of your waistband. Now find the centre points of both ends and pin again, pinning one layer of jersey every time, you will now have the skirt pinned to the waistband in 4 places.
Pinning waistband to recycled t-shirts


Now pin your jersey to your skirt, halfway between these pins again and you will have 8 pins attaching your waistband to the skirt, check to make sure you have not pinned anything you shouldn't.
Now with your machine set on a straight stitch using your presser foot as a guide you are going to sew your waistband to your skirt, now go slowly.

Sewing waistband to skirt

Make sure that the stitching is catching the jersey at the back as well as the waistband , you may need to stretch the elastic waistband to the length of jersey between the pins, the easiest way to do this is if you are right handed, stretch the elastic gently with your right hand at the front and gently guide the elastic out the back pulling slightly with your left hand, sorry I couldn't get a picture of this, I had no free hands at this point.

Just take your time with this bit.

And here you have a jersey skater skirt

Recycled skater skirt finished


And here you have a little jersey skirt, my skirt is a little boring in the colours , I used what I had at the time, but you could use any combo of colours, create a patchwork design, use old band t-shirts, and make this skirt in any size, child or woman . If you make one of these skirts I would love to see it.
Until next time happy recycling


Tuesday, June 11, 2013

Recycling a denim shirt tutorial

Whilst having a wander around pinterest as you do I found this
and loved it so much I decided to give it a go myself so I have written a little tutorial of what I did to create the look.
As luck would have it a local charity shop was having an everything for a pound sale on Friday, and I found the perfect denim shirt for upcycling
Recycled denim shirt supplies

Denim shirt folded
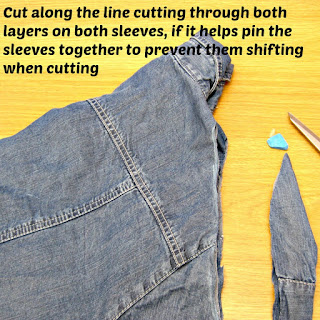
Denim shirt mark cut line
Denim shirt cut pattern out
Denim shirt recycling cut out piece
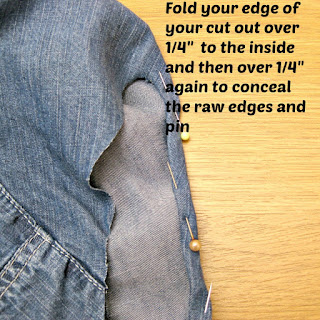
Denim shirt pin hemline
Sew hemline

Be careful as you are doing this, as you can see from the finished photo mine has puckered slightly along the bottom edge

Recycled denim shirt finished

And here is the finished article, you can make the cutouts as deep or shallow as you want, you could insert a lace panel, using your cutout piece as a template and cutting maybe 3/4" larger all around and tuck the raw edges under your folded raw edge to enclose your raw edge of your lace panel.

Just try it out and find what suits you, happy recycling


Tuesday, June 04, 2013

How to recycle a pillowcase in to a little girls skirt tutorial

This is a simple little sewing tutorial for making a little girl's skirt from a pillowcase, you know how I love a bargain and to recycle, well this is a combination of the two , suitable for a beginner sewer and upwards in 13 easy steps,the finished skirt would be suitable from approx. 0 to 6 years of age


You will need the following
A standard pillowcase 29 inches x 19 inches
A pair of scissors
Seam ripper
Thread to match your pillowcase

1 inch wide elastic, 1 inch longer than your child's waist measurement in my case I needed a 22 inch piece of elastic
The elastic, should preferably be non-roll elastic , but standard is fine if you don't have it.
A safety pin or bodkin to thread the elastic


So that you can turn this

Recycling a pillowcase to girls skirt supplies


Into this

Finished trecycled girls skirt

Step One

Measure the child's waist and add 1 inch , this is the length of elastic you will need in my case age 4-5 years 21nches + 1nch so cut 22 inch piece of elastic.
Measure from the child's waist to where you want the hem of the skirt to hit, in my case 17 inches long , then add 2 inches to this so 17 inches +2 inches =19 inches long.

Step Two


Lay your pillowcase on a flat surface with the long edge placed horizontally right side out , sewn edge to your left and open end to your right, measure along the top and bottom ,your waist measurement of your child, in my case 21 inches from the sewn edge toward the open end ,and mark with chalk or dressmakers pencil, join the marks and cut along this line see below, do not throw the smaller piece of fabric away you could use this for a scrunchie or hair bow, or I do have another idea brewing but need to try it out first

Lay pillowcase out to cut to size

Step Three

At this stage you will just have a shorter pillowcase, you will now need to get your seam ripper out and carefully open up the seams along both of the longer edges , you will then have one long piece of fabric in my case measuring 42 inches x 19 inches

Recycling a pillowcase top a girls skirt

Step Four

You will now need to serge along both of the long edges of the fabric, if you have one, if not set your sewing machine to a medium zig zag stitch and sew along both of the long edges of the fabric to prevent fraying, if you are zig-zagging remember to change your machine back to straight stitch after, I point this out as so many times I have forgotten and had just a tiny bit of a hissy fit .

Step Five

Fold over the fabric on both of these edges , 1/4 of an inch, folding in the fabric from the right side of the fabric to the wrong side and iron , this will give you a neat finish and will be easier to sew. Sew along both of the long edges with a straight stitch sewing 1/8 inch from your folded edge, to sew the hems you have just ironed down as shown below.

Hemming a girls skirt

Step Five a


If you are not using a serger , and zig-zagging your hems, use a zig-zag stitch to zig-zag along both of the shorter ends to prevent fraying, if you are using a serger carry on to the next step

Step Six

Now we are going to create the waistband casing

You now have one long length of fabric with top and bottom neatly hemmed , now place your fabric , long ends lying horizontally and wrong side of the fabric facing upwards with what will be the top of your skirt at the top. For this check your pattern on your pillowcase , some it won't matter , but in my case I wanted to make sure Peppa Pig was the right way up and not hanging from the ceiling.

Mark a line with a dressmakers pencil or chalk 1 1/2" inches down from your top edge the long side of the fabric,you need to iron along this line to iron the right side of the fabric over to the wrong side as shown below How to create a waistband casing for a skirt

Step Seven

Now you need to place your short ends together, with right sides facing , pin together from the bottom hem upwards, now this is the really important bit, when you get to the waist band casing you have just ironed, open it up and pin, do not pin with it folded over or you will regret it, you will never be able to thread your elastic through.
Now serge or sew , which ever you are using,a 5/8" seam, sewing the two short ends together to form a tube.

Step Eight

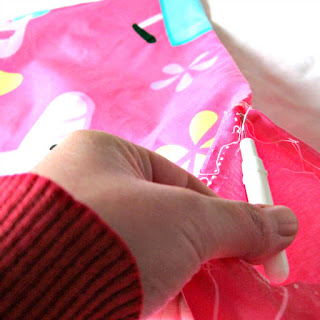
Turn your tube so that the right sides are facing outwards and fold your waistband casing you have ironed inwards going with your ironing fold, now place a pin on the wrong side of the fabric 1/2 inch away from the seam you have just sewn on either side you will see from the photo what I mean, these will be your markers for stopping and starting sewing so as to allow space to insert your elastic.
Continue to pin your elastic casing down with your pins in opposite direction to the first two.

Sewing a waistband casing shut

Finished waistband casing

Step Nine

Now you need to sew the waistband casing down using a straight stitch, sew along your hemmed edge, 1/4 of an inch in from your hemmed edge starting from one of your pins placed either side of the seam , sew all the way around to the other and stop at your pin on the other side of the seam, this will leave you a 1 inch gap to insert your elastic.

Step Ten

Cut your elastic, 1 inch longer than the waist measurement you require , you will need 1 inch wide flat elastic, I used non-roll which is preferable but not essential, if you just have standard then use that but be careful it doesn't twist when you are threading it through.
To thread your elastic through the waistband casing I use a safety pin pinned in one end, and push this into the casing through the gap you have left, using your pin to drag the elastic through , right around to the other side. The fabric will bunch up that's fine, just make sure you don't let the elastic pull all through the casing, make sure you have a 2 inch tail still showing as you will need to sew both ends together.


Threading elastic in a skirt waistband
Add caption


Step Eleven

Once you have threaded your elastic all the way around the waistband and you have two ends of elastic sticking out , safety pin them both together, so they don't disappear back inside your waistband never to be seen again. Now feel along the waistband to make sure your elastic is straight and has not twisted.
If it has, untwist it by working the twist along to the end of the elastic and unpinning the elastic ends and pin back together.
Now pull the elastic so you have about three inches of each end and overlap them by half an inch each so that they lay flat and the elastic remains untwisted

Sewing elastic waistband shut in a skirt


Step Twelve


Now sew a little square around the elastic where it overlaps using a small zig-zag stitch, you will need to use zig-zag to allow the elastic to stretch.
Pull the elastic back inside the skirt, you can do this by stretching the waistband and the elastic pops back in. Try the skirt if possible on the intended lucky little girl for fit, if it is a little loose you can cut a little off the elastic and re-sew it together. If it is a little tight you can cut the elastic and take it out and thread a longer piece through.

Step Thirteen

When you are sure the waist is the correct size, sew the inch gap closed on the waistband using a straight stitch


And your skirt is finished, 13 steps from pillowcase to skirt

Finished pillowcase skirt

I must apologise for the mysterious ghostly hand holding the levitating skirt, but my usual white screen is not available as we are currently building a Martisanne office/sewing room.
We tried it with my husband holding the hanger with his arm showing but they are large ,hairy and tattooed so did not really fit the look I was looking for with the little pink skirt or worse still you might think it was my arm !

Enjoy recycling your pillowcases you could make a whole wardrobe full for next to nothing, and they make great presents, until next time happy recycling !


LinkWithin

Related Posts Plugin for WordPress, Blogger...