Tuesday, September 24, 2013

How to make a jewellery organiser part two

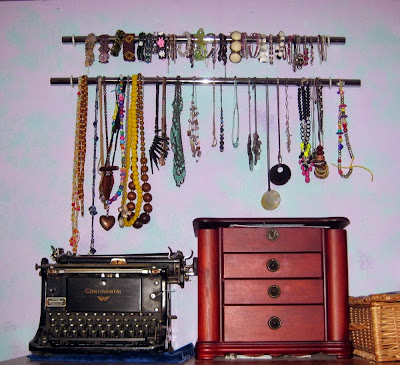
Following on from this post here, we have been making an organizer in the Martisanne household for my many necklaces and bracelets , again I can't take the credit for these, the idea is from this from here
All you will need is a pole or two, I use two hanging rails from an old wardrobe, kept as you never know when they will come in handy to upcycle, and for each pole you will need two hooks , one for each end of the pole , the hooks we used were about £1.50 for a pack of two in our local hardware store.

The hooks we used were a little small so we opened them up to allow the pole to be a little looser fitting resting in the hook.

Screw your hooks into the wall, where you want your pole to go, one at each end, slide your bracelets and necklaces onto the pole(s)and rest your poles on the hooks, and you have a necklace/bracelet holder.


diy jewellery organiser
Diy jewellery organiser


This is a perfect way to store your necklaces and bracelets to keep them tangle free and you can see exactly what you have.

Tuesday, September 17, 2013

What have I been sewing now ?

With the house elves safely settled back into school , I have had a little bit of time this week to get creating for my shop, if you follow me on Twitter you might have noticed me jumping up and down announcing opening a new shop, so there are now two places you can purchase Martisanne handmade goodies, you can click on the tabs at the top of the screen to be transported to my Etsy shop as before, but look there is a new tab for my new shop my Zibbet shop yay twice the handmade fun.

Some of the items available to purchase in My Etsy store are also available to buy in my Zibbet store , but there a couple of new goodies that I have been sewing this week that are only available in my Zibbet store so far .

A few weeks back I purchased a length of gorgeous satin feel balloon print fabric that just screamed celebrations, birthdays, Christmas PARTY TIME !!!
I just couldn't make up my mind what to do with it, but with the school holidays over with I started thinking about Christmas, I know I know but us crafters always have to be one step ahead of you buyers you know.
So I decided to create these little money wallets/gift card holders, a gift card just fits snugly inside , perfect for any gift giving and here they are

Fabric gift card holder
Handmade gift card holders

Gift card wallet
Gift card wallet

You can purchase them in my Zibbet shop

Also around the same time I purchased the balloon fabric, I also bought three beautiful lightweight fabrics in shades of blue and purple, they all looked so
pretty together I bought all three, and have waited as to what to do with them , as I have so many ideas for new designs I couldn't decide what to do with them, to procrastinate or not to procrastinate, so I just got on with it and put them all together in a pretty patchwork cosmetics purses.
The lovely little crochet bonnets on them I had already just waiting for the right project and I think this is it

Cosmetics bag purple patchwork
Available to purchase in my Zibbet shop
Fabric cosmetics bag patchwork
Cosmetics pouch purple patchwork
 
Again this is available to purchase in my Zibbet shop

I am off for more procrastination now perhaps a little sewing thrown in, have a great week and pop back next Tuesday to see what I have been up to.

Tuesday, September 10, 2013

Never fails quick chocolate party cake recipe

I wanted to share with you a never fail really quick chocolate cake recipe, my children always want it for their birthday tea cake and any other events in between, I have tis recipe written out in my favourite recipes file, but I am not sure where it came from originally, I know I didn't invent it and that is as far as I can go with the source I am afraid. This recipe is quick, easy and never fails so here goes , you will need the following:

Cake
8oz caster sugar
3 eggs
4oz plain flour
2 heaped teaspoons baking powder
2 heaped tablespoons cocoa powder
4floz milk
1 tablespoon of butter/margarine about the size of an egg

Frosting

3oz butter
6oz icing sugar
3 table spoons cocoa powder


Heat your oven to 180 degrees centigrade and line 2 x 8 inch sandwich tins with baking parchment , preparation and all that business.

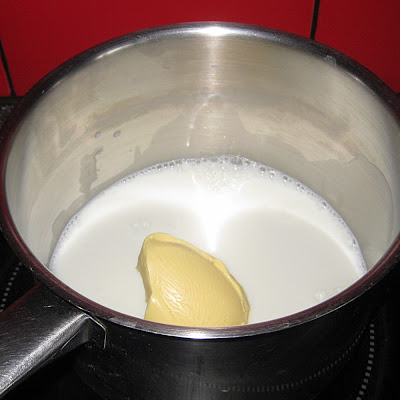
Next place your milk and egg sized blob of butter or marg whichever you are using in a saucepan and place on a low heat.

Melt butter in the milk

While your butter is melting place your eggs and sugar in a large mixing bowl

Beat eggs and sugar
Beat eggs and sugar

Beat until smooth and creamy


Add in your flour, baking powder and cocoa powder and mix well

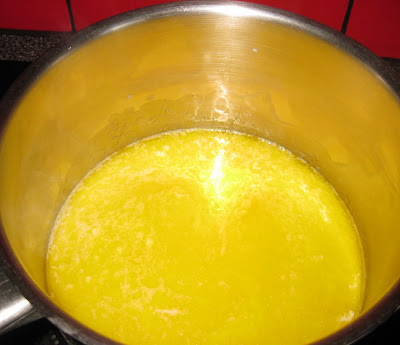
When your butter has melted in your milk and the milk is starting to froth around the edge

Melted butter and milk

Pour the milky mix into your mixing bowl with the other ingredients and mix well


Chocolate cake mix finished

Distribute evenly between your sandwich tins

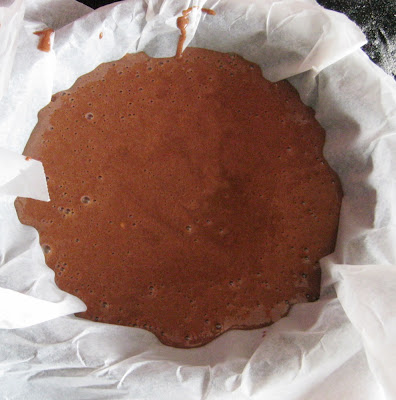
Chocolate cake mix in tin
Chocolate cake mix placed in tins

Throw your filled sandwich tins in the middle of your pre heated oven for approximately 18 minutes or until springy to the touch and cooked through, insert a skewer to check if comes out clean it is cooked,

Chocolate party cake recipe finished
Finished chocolate party cake

Leave to cool , and when they are cool you can make the frosting, this recipe gives enough to sandwich between the two cakes, a spreading on the top and some in the bowl to lick afterwards.

Sieve your icing sugar and cocoa powder in a bowl and add the butter or marg

Chocolate buttercream recipe

Beat it all together squashing the butter into the powder, you have to work hard at this it seems like there isn't enough butter for a while, be patient, you want a spreadable consistency but not so thin it slips off the top of the cake, you may have to add a very tiny touch of water to thin it .Spread it on one of your cakes and plop the other on the top and spread some more of the frosting on the top.

Chocolate butter cream in the cake
Place the chocolate buttercream in the cake

Chocolate party cake iced
Iced chocolate party cake


I add chocolate buttons to the top of the cake sometimes or smarties or grated chocolate, they stick nicely to the buttercream.
I cannot vouch for how long this cake will keep as we have never got past day two.

Helpful Hints


I though I would share a few helpful hints I have found through the years of making and eating endless cakes

1) I don't buy self raising flour , I always buy plain and add the appropriate amount of baking powder to convert it to self raising, I am sure there are some puritans that will tell me I shall burn in bakers hell for this , but I like space in my cupboards and don't want weavels from having endless bags of flour

2) Cocoa powder I just use standard cheap as chips cocoa powder, none of this 70% cocoa solids , if you like that kind of thing that is fine, but I am yet to hear my five year old proclaim that her cake does not have a high enough cocoa solids content, I am not entering the Great British Bake off I am cooking for my family.

3) I use whichever butter or marg I have to hand again not entering a baking competition, my family will devour the cake if I am using cheap marg or expensive butter, maybe we just have no class .

4) I have also cooked this cake by doubling the quantity and baking in a roasting tray lined with baking parchment , spreading on the frosting, or just a plain icing, cutting into squares and open freezing then sealing in freezer bags and they are brilliant for picnics or lunchboxes, once defrosted. This cake is also great in the winter without the frosting and served with hot custard.


Enjoy your cake

Tuesday, September 03, 2013

How to make a DIY jewellery organiser for next to nothing

Following on from my cherub hunting for the soon to be new theme in the Martisanne bedroom, I have been pondering for a while the problem of my jewellery and this really falls into two parts, I need it displayed so I can easily see what I have and secondly I need it stored in such a way as it does not take up more surface space, so I started googling and came across this awesome idea here so I set about making an earring display myself.
Being a bit of a hoarder it did not take long to source the required items, I had a large pine picture frame that had long since lost it's glass and plenty of leftover chicken wire from making our chicken run, my trusty silver spray paint and every diyers staple a heavy duty staple gun (lame joke I know).

First place your picture frame over your chicken wire and cut your chicken wire just slightly larger than your frame to allow room for stapling, I used wire cutters for cutting the chicken wire.


Jewellery organiser supplies

Now staple your chicken wire to the back of your frame ,using a heavy duty staple gun taking care to ensure the wire is stretched tight and not baggy

Diy jewellery organiser
Staple wire to the frame

Now clip off the excess chicken wire carefully with your wire cutters so that it does not show at the front of your frame

Clipping excess wire from frame

I wanted my jewellery organiser silver so I sprayed it with my silver spray paint

Diy jewellery organiser painting
Painting the diy jewellery organiser

And here you have it , a brilliant way to organise and display your earrings, just hang them off the wire, as I mentioned previously I can't take credit for the idea I originally found it here but wanted to share my making of my own earring display, jewellery organiser.

Finished jewellery organiser


Tuesday, August 27, 2013

Easy Peasy Cherub Upcycling

At the minute we are thinking of redecorating our bedroom, I want a colour scheme of red and silver, so with this in mind I am keeping my eyes open for materials that can be recycled to fit the scheme or will go with the scheme I have in mind. I currently already have a few cherub items that I have collected over the years, that will go perfectly with the bedroom scheme I have in mind.
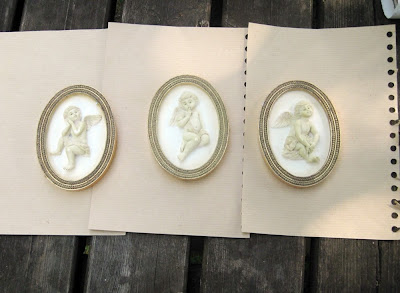
On Sunday at a local car boot sale I found the following cherub plaques

Cherub decorations
Original cherub decorations

As you can see they are not silver or red, but they were solid undamaged, easy to hang and just what I was looking for apart from the colour, and they were only One Pound for the three, so out came my trusty plastikote silver spray paint , apply liberally and you have

Upcycled cherub decorations
Finished upcycled cherub decorations


A little tip with the paint, it is better to spray a few light coverings than one heavy one, you will get better non runny coverage this way.

The three silver cherub plaques will fit in perfectly in my new bedroom scheme now.
A lot of my moneysaving comes from pre planning, I am collecting items for my new bedroom scheme now to decorate in a couple of months, I also want to redecorate the lounge so I will keep my eye out for the next couple of months for paint and items for the room. Always look at a piece of furniture or ornament with creative eyes and ask yourself is it Ok as it is ? can I change it or add to it for it to be what I want or need it to be ?.
Plan ahead to avoid I need it now scenarios, I buy Christmas cards and wrapping paper in January, I make and buy presents for Christmas and birthdays all year round, I have two spare pairs of oven gloves for when mine are ruined again because they were in the sale, I buy lunchboxes when they are on sale for when the children ruin their current ones, plan plan plan !!
Planning ahead will save you time , money and stress, so will upcycling and recycling, embrace them both.

Tuesday, August 20, 2013

Creating memories in a jar tutorial

Well we are heading towards the end of another six weeks school holiday and if your children are anything like mine they are collecting "things" everywhere they go, we have seashells and sticks to name but a few. To you and I they may just be junk but to the child that has collected them ,they are memories, memories of a place a time and people. If your anything like me you want your children to keep these items but it gets to a question of where to put them, our shells were on a bathroom shelf, but after 4 weeks the novelty of dusting fifty seashells is just about wearing thin, so I will share with you my solution "memories in a jar", it is a little craft project you can share with the children, that also involves my recycling so it is all good.


Memories in a jar tutorial supplies


You will need to gather your supplies :

Empty glass jar , coffee jar, jam jar , anything with a screw top lid
Silver spray paint (optional)
Small amount of ribbon (optional)
Memories (seashells, twigs, pinecones etc).

First clean you your jar and dry, if you have trouble getting the label off, try soaking it in hot soapy water for an hour or so. Next if you want to as I have done grab your silver spray paint to spray your jar lids, I only sprayed them because I had some left over from a previous project, as it can be quite expensive to buy. A thrifty tip look out for spray paints on discounted shelves in hardware stores as you can often get them cheaper as shop damaged stock with cracked lids, so if you see them buy them as I do for little craft projects.

Leave your jar lids to dry, go by the instructions on your paint. Fill your jar with your shells or pine cones or whatever memory object you are using , I also added some glass beads into mine that I found at a car boot sale, screw the top back on your jar and tie a little ribbon bow around the top if you are using any.


Finished memeories in a jar
Finished memories in a jar

I also had some shells that no matter how much ,mind over matter or manual manipulation I used they just would not fit into any of my jars, so I used these as tea light holders shown below

Seashell tealight holder

Waste not want not.

Until next time in enjoy your crafting and recycling

Tuesday, August 13, 2013

How to make a funky little rag wreath tutorial

I have a little project for you that can keep little fingers and big fingers busy ,you will need the following :

Scraps of fabric (How much depends on how big you want your wreath to be )
A steel hoop or coathanger to make into one, or you could use a ready made wicker one or even cut one out of stiff card
Scissors
Small length of ribbon to use as the hanger


First cut up some scraps of fabric , or recycle old clothes use whatever you have available , my hoop was approx. 4 1/2 inches in diameter so I cut my scraps 1 inch wide x approx. 7 inches long.

Fabric strips for rag wreath
Cut fabric strips for rag wreath

Grab your hoop, mine was part of a dream catcher set that was too complicated for my children to do, but you could use a coathanger and cut it carefully and re-shape it , or you could make a hoop from really thick card, it doesn't even have to be circular you could make it heart shaped , or if you are feeling really adventurous you could go for a star shape.
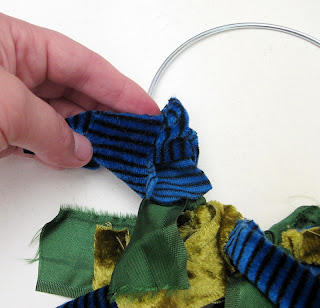
Grab a strip of fabric and tie it in a simple knot around the hoop, so that you have equal amounts of fabric either side of the knot with your fabric strips faced outwards and the knot on the inside of the hoop.

rag wreath tutorial
Rag wreath tutorial tying the fabric strips

And you just carry on doing the same thing over with more fabric strips ,pushing them together as you go


Rag wreath part way done
Rag wreath partway done

Some of the strips I am using on the blue and green area little un-uniform in length, I will see how I feel when I have finished this one but I may trim down some of the strips with scissors, it is your wreath so just go with the flow add in the colours you want and if the strips are a little long or straggly , just give them a haircut.

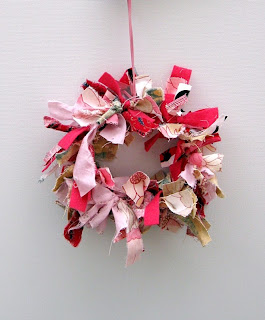
To finish off the wreath use a strip of cord or ribbon and knot it around the hoop to form a hanger to hang your wreath by.Here is a pink wreath I finished earlier

Finished pink rag wreath pink
Finished pink rag wreath


I would love to see any that you have made , so go mad make them in every colour , size and shape, and they are great to make with the kids , please do the cutting for younger ones to be safe and have fun :-)

Monday, August 05, 2013

The Martisanne household has just increased by three !!!

As the title says we have just increased our household by three, we are a household of 2 adults, 3 children, 10 chickens, numerous fish , mosquito lavae my son has caught and is growing in a sea monkey container, the daddy long legs that keeps walking across the television when I get to the interesting bit in a film, the occasional hair pets that come home from school, and now we have managed to squeeze in another three newcomers

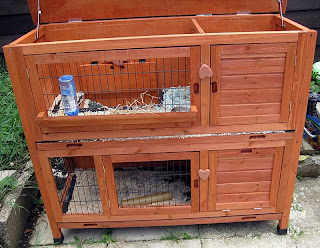
This is their home, can you guess who they are ?

Small animal hutch

Another clue

Guinea pig hutch

Have you guessed yet ?

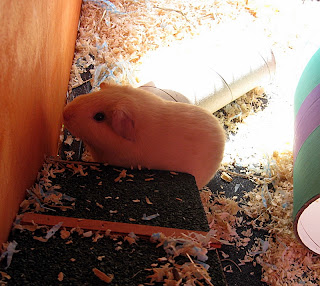
Guinea pig

And a front view

Guinea pig front view

Have you got it yet , even though they keep trying to hide

Guinea pig

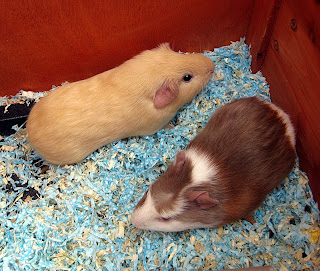
Yeeeeeeahhhhhhh you got it, we have three shiny new 7 week old guinea pigs


Pair of guinea pigs

Guinea pigs 7 weeks old


Yup cardboard tube for tea again

Guinea pig eating tea


We have 3 little boys, one cow print and two sandy coloured guinea pigs, promise we do have three even though I only seem to be able to get two in a shot at a time, we are all really excited about our new additions to the family, so much so that my daughter is insisting hers is a girl and has informed me that her guinea pig NEEDS a dress and you are allowed to put them in dresses and she will pick which fabric it will be made from, G-Force has a lot to answer for :-)

Before I sign off for this week I am having a little Summer coupon sale in my shop here feel free to come in and take a look around

Martisanne Etsy shop products


Tuesday, July 30, 2013

Our little holiday in Devon, United Kingdom

I thought I would share with you some of the beautiful scenery we came across on our holiday last week, we had a week in the South of England in Devon in a lovely secluded cabin in the woods
Dragonfly Devon United Kingdom

We found this little fella clinging to the cabin door frame munching on a little bumblebee


Hallsands Devon United Kingdom

This is a little abandoned village called Hallsands, part of which has fallen into the sea, you can read all about it here

Devon Beach

A lovely picture of the coastline, it was a bit misty on this day, I just thought the parked up bikes looked so lovely sat there.

Stream in Devon United Kingdom

This little stream was at the bottom of the road from where we were staying ,you could hear it at night.

Sorry it is such a fleeting visit today but the school holidays are upon us and my role in life has now been extended to chief entertainment officer, for all of those with children also at home during the school holidays, I salute you and wish you luck, until next time ......

Tuesday, July 16, 2013

Girls dress tutorial using jersey fabric with a butterfly motif

Well last week , my daughter came home with a dreaded letter from school, to say they are having a mini beast day and they could dress up as a mini beast for the day, unfortunately my daughter had also been told about this and had clearly spent her time since planning out the outfit that she was going to wear and mum being a sewer was going to magic one up. My girl being my girl, with her own ideas decided she was going to be a butterfly, now I am not sure if a butterfly technically qualifies as a mini beast, maybe some one could clarify for me, but who am I to argue with a five year old who has spent a day planning her dress.
With a bit of discussion we came up with the following dress, that could also be worn on other occasions to.
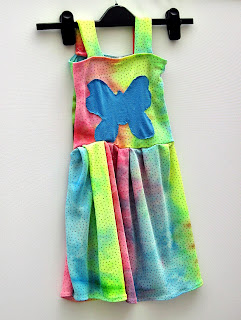
Girls jersey dress with butterfly motif

I have used a multicolour two way stretch jersey I already had, but you could use old t-shirts sewn together, any stretchy fabric will do . So here is how I made my butterfly dress.

Measurements needed are chest circumference measurement + 2 inches (example chest measurement 22 inches + 2 inches = 24 inches )
Armpit to waist measurement + 1 inch (example armpit to waist =10 inches + 1 inch = 11 inches )
Waist to knee length + 1 inch (Example waist to knee measures 14 inches + 1 inch = 15 inches )
Measurement over shoulder , armpit front to armpit back = 5 inches

First cut out 2 x chest pieces measuring chest + 2 inches divided by 2 this measurement needs to follow the stretch of the fabric so that it will stretch around the childs body x (Armpit to waist measurement + 1 inch)For my example each piece measures 12 inches x 11 inches
Then cut out 2 skirt pieces measuring (waist to knee + 1 inch) across the non stretchy direction of the fabric , and following the stretch of the fabric measure (Chest + 2 inches x 1 1/2 )divided by 2 , if you want a fuller skirt measure 2 x waist measurement for this dimension. In my example my skirt pieces measured 15 inches x 18 inches

Cut out 4 x strap pieces measuring over shoulder length measurement (along the stretch of the fabric), so shoulder straps will stretch over the shoulder x 3 inches
In my dress the strap pieces measured 5 inches x 3 inches


You will also want to cut a butterfly motif out of a contrasting piece of jersey fabric, to do this fold a piece of paper in half and draw half a butterfly shape against the fold and cut out, this gives you a symmetrical butterfly , use this cut out as a pattern for cutting your butterfly shape out. I find it easiest to pin on the fold and fold your paper butterfly back up and cut fabric as you did your paper butterfly.

You now need to pin your fabric butterfly to the front of your dress centrally ensuring your butterfly is flat against the dress front , you can fold your piece lengthways to centre up the butterfly as below

Girls dress tutorial bodice piece

And sew your butterfly to your front dress piece ensuring it is the correct way up using a small zig zag stitch along the edge of your butterfly, when your needle moves to the right it should land just over the raw edge of your butterfly.

You should end up with something like this
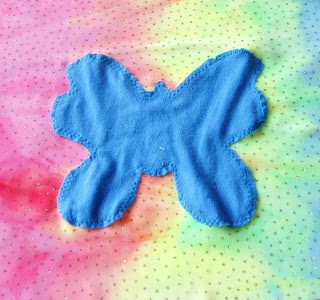

Girls dress butterfly motif

You now need to place both of your dress top pieces right sides together pinning in my case the shorter 11 inch length together on one side only and serge or sew and zig-zag to prevent fraying using a 5/8 inch seam allowance.

You will now have one length of fabric , next serge or zig-zag along the top of the dress top pieces and turn over 1/4 inch from right side to wrong side and zig-zag to create a stretchy hem.

You now need to sew the other short sides of your dress top together placing the pieces right side to right side again serge or sew and zig-zag with a 5/8 inch seam allowance so that you then have a tube .

Girls dress finished bodice piece

Follow the same steps for the skirt pieces again sew 2 pieces together to form one long length , sew the bottom hem and then sew together to form a tube , you will now have two tubes.

To sew the top and skirt together, turn your skirt with the wrong side facing out and the hem at the bottom, and place your top right side facing out hemmed top pushed downwards inside your skirt tube until the raw edges are lined up.
Find your side seams on your skirt and your top and pin the side seam on each side together , find the midpoint between the pins on your skirt and top and again pin together . you will now have 4 equally spaced pins.

Girls dress tutorial pieces

Gather your skirt piece evenly and pin to your top using as many pins as you need to hold it in place

Gathering skirt piece of girls dress

Serge or sew and zig-zag using a 5/8 inch seam allowance all around this raw edge you have just pinned, make sure you take your pins out as you go especially if serging. Sergers and pins do not make for a happy couple.

Turn your dress right side out , you are nearly done just need the straps, sew your strap pieces together sew two pieces together, right side to right side using 5/8 inch seam allowance along the long sides of the strips only to form a tube. Turn your tubes right side out , and turn the raw edges at the end of each tube inward and pin one strap at each side of the front of the dress equal distances from the side seams on the inside of the dress front , I measured on my daughter where these needed to go, for me the distance was 1 1/2 inches but this may be different for you, pin your strap pieces same distance apart on the back of the dress .

Sew the strap pieces on where you have pinned them and your dress is done. My butterfly ended up slightly wonky on my dress as unfortunately I had a problem with my serger and some of the dress got snarled up in it , long story short adjustments had to be made . My daughter is in love with the finished dress so its all good. Take a look and see what you think.

Girls dress with butterfly motif finished

If you like my little sew along tutorials I also sell them in my  Etsy shop e patterns , or if you enjoy the finished product but not so much the process of creating you can view my finished products for sale in my Etsy shop

Until next time , happy sewing
LinkWithin

Related Posts Plugin for WordPress, Blogger...