Showing posts with label handcrafted. Show all posts

Wednesday, July 30, 2014

Upcycling tiny fabric scraps and jewellery making

Follow">http://www.bloglovin.com/blog/12739685/?claim=fcmbs9hdkj4">Follow my blog with Bloglovin
A bit of an unscheduled blog post , but I am really excited about a new line I am creating in my shop so wanted to share, plus the vapours from the Epoxy glue may have infiltrated my brain.
I have started venturing into fabric jewellery making, yaaay, what's not to love fabric and jewellery combined.
If you follow me on Instagram you may have seen a few weeks ago I ordered some new supplies , pendant trays and cabochon glass tiles , only one type and size at the moment to see how things go, as being a small business I just can't afford the outlay of a 1000 different types of supplies , as much as I would love to.
This little foray started with a small piece of fabric I found in a charity shop, a lovely print with such pretty flowers but too small really to make much from but too pretty not to take home, so off it came with me, where I had this little idea of making it into jewellery , it's beauty forever frozen behind a glass tile.
So here is the story of my fabric pendants, first I gathered my supplies, you can see just how cute the fabric is and why I had to have it.

Fabric jewellery making supplies
Supplies at the ready

And a closer look at the floralicious fabrilicious flowers on the fabric.

Floral fabric for pendants
 
 
The pendants have been handmade by me , hand cutting the circle of card that backs the fabric, hand cutting and individually selecting the area of the fabric to go into the pendant.
 
The pendants are then constructed using a strong glue to bond all the layers together and you have the finished result , individual original floral fabric pendants , preserving that tiny scrap of fabric that would have ended up in the bin.

These pendants really show what my Etsy shop is about, handmade and constructed , and using up bits that would normally go to waste , upcycling and giving a tiny little scrap of fabric 1 inch in diameter a new lease of life.

These pendants will be available for sale in the shop shortly .

Floral fabric pendants
Finished pendants


Friday, July 18, 2014

Creating curves when sewing with french curves

Welcome to another little adventure in sewing land , I wanted to share with you a nifty little find, I found in our local recycling shop , not another one I hear you say !
I actually do pop into the recycling shop once a week if I can and I usually find something that I need / want, sometimes it is a combination of the two , like this week, have I kept you in suspense long enough ? This week it was tadaaaaa


French Curves for sewing
French Curves

French curves, now these as you can see from the photograph are the plastic type not the croissant type. These nifty plastic curves were brand new in the packet and I bought them for a princely sum of 20 pence .
That is all well and good I here you say, but what does it do ? I can tell you now it is doing it now, being all curvy. French curves are also known as dressmakers curves and draftsmen curves and probably have a 100 other names but those are the ones I have heard of .

French curves are just pieces of in this case plastic with a series of curves that can be used for drawing curves on drawings, sewing patterns and cutting fabrics etc.

I became in dire need of these little curves today when I discovered that I have lost the A line dress pattern that I had created for my daughter, since my daughter had already spotted the mermaid fabric to be upcycled there was nothing for it but to draw up a new pattern.

Luckily I found the dress I had made from the pattern, folded the dress in half lengthways , drew around it and added a seam allowance to create a new pattern.

Although I was not over the moon with the curve of the neckline or the curve of the sleeves from the tracing , so in came my french curves.

Using a french curve to draft an armhole

You can see from the photograph above I used the curve to create a nice evenly curved  armhole on the dress pattern , I just picked the curve that looked most suitable and lined it up and drew along the curve and cut the pattern. There was nothing technical to it just picked the curve that gave me the shape I wanted.

I also used a curve for the neck line , you can see from the photograph below

Using a french curve to create a neckline


Again nothing technical just use the curve that best suits your purpose . There may be a really technical way to go about drawing curves on sewing patterns when manually creating a pattern but this is the best way I have found.
If you don't have French curves , you can use objects that you have in the house, plates , cups, glasses , bowls , I admit to having used a dinner plate before and it did a fine job of creating a curve.

Please note I am not a trained seamstress, everything I have learned has been self taught and trial and error , so what I may be showing you may not be the "right" way but it is my way.

I thought I would also show you the finished mermaid dress created from an upcycled curtain that cost £3.00 from a charity shop , sorry it is not an amazing photograph, it was taken on my phone , and I can't get the dress of my daughter's back long enough to get a proper photograph, but you can get the gist from the picture, just a slip over the head A line dress , no zips or buttons , easy to wear my daughter's favourite type of dress and with the pattern ready to go it takes 30 minutes to make .
Upcycled girls mermaid dress


Tuesday, July 01, 2014

How to make a little girl's nightdress from a pillowcase tutorial

My little girl has been dying to have a nightdress like her grandma for ages , and I have hunted high and low but found it difficult to get hold of  a little girls proper nightdress at a reasonable cost , it is all pjs and t shirt nighties .
I don't know why I didn't think of this sooner but I decided to make my own, and forever thrifty bought two pillowcases for 99p from a charity shop to make some out of , and here is how I did it .

You will need a pillowcase

Pillowcases to recycle to a little girls nightdress


Scraps of fabric dependent on size of nightdress to be made
elastic trim
thread and scissors
ribbon (optional)

I will start by saying my daughter is 6 years old but quite a small 6 and these measurements are for her but you can adjust to fit.


                                                   This is what you will be making


Little girls nightdress made from a pillowcase


First you need to deconstruct your pillowcase , that flap bit that holds your pillows in we want to take that our you will need to cut along the fold line of the pillowcase , that is fine, keep your cut off though we need this.

Deconstructing pillowcase to make a little girls nightdress
And you see this hemmed edge on the opposite side to the flap we cut off , snip it off along the stitch line otherwise our final nightdress hem will be too bulky.

trimming hem from pillowcase

Snippety snip , now turn your pillowcase around and cut as close to the folded edge as you can right across the width of the pillowcase to open up the pillowcase into a tube.

creating a tube from the pillowcase
 
 
Jut a note at this point , if any of your side seams start to unravel, mine did , just sew them back up again at this point.


Next we need to create a hem at one end of the tube, fold your raw edge into the wrong side of the pillowcase 1/4 " and fold over again 1/4" enclosing the raw edge, pin in place and sew using a straight stitch, do this for one end only.

Folding hem of nightdress
 
Fold hem enclosing raw edge


I decided to sew some princess ribbon and ric rac around my hemline for decoration as my pillowcase was plain but it is entirely up to you what you do.

Next we are going to create the straps , grab your large piece of fabric that you removed from the inside of your pillowcase . I cut mine into two pieces measuring 9 1//2 inches x 4 inches , this was to make my straps 1 inch wide and I measured on my daughter , where I wanted  the nightdress to start on her chest and over her shoulder to the opposite point on her back and added 1 inch


To make the straps fold your fabric with the wrong side of the fabric facing up, in half lengthways and finger crease and open up, fold your long raw edges to this centre line so they meet then fold in half again enclosing the raw edges, open again and fold in the raw edges on your shorter sides by 1/4 inch to the wrong side of the fabric and fold up again along your crease lines and pin, you should have no raw edges protruding , do this for both straps.
Sew along all four sides of both straps using a straight stitch and 1/8 inch seam allowance.
I also sewed a strip of ribbon onto mine to jazz it up.

A note , if you don't have enough fabric from your pillowcase flap for the straps use another piece of scrap fabric that does fit.
 
sewing pillowcase nightdress straps


Next we need to attach the straps and hem the top off the nightdress , first measure where you want the straps to be set on the nightdress , measure your child for this but allow for the fact the nightdress top will be gathered , for my daughter the outside edge of the straps needed to be 4 inches in from the edge of the pillowcase so this is where I marked the pillowcase for strap placing on front and back of the pillowcase.
 
We are going to do as before for hemming this end of the pillowcase fold under 1/4" to wrong side but before folding again trap your strap in the fold and fold 1/4 inch again and pin in place, do this for the four strap positions , both ends of the two straps , and sew all the way around creating a hem using a straight stitch.
Attaching strap to pillowcase nightdress


attaching strap for pillowcase nightdress


Next we need to elasticate the top of the nightdress to stop it swinging around in the breeze, I used this , an elasticated trim
 
Elasticated trim
 
 
Measure your child's chest measurement and cut your elasticated trim to this size plus 1/2 inch, my daughter's was 24 inches so I cut the elastic to 24 1/2 inches .
Sew your elastic into a loop by overlapping the ends 1/2 inch, be careful not to twist it, your elastic will end up 1/2 inch smaller than your chest size.
 
Now we need pins , you are going to fold your elastic in half , with the sewn ends at one end, pin your seam to one of your side seams , on the outside of your pillowcase , the end with the straps and pin the folded end of elastic to the other side seam , so your elastic is distributed equally between side seams.
Next find the halfway spot on your elastic between these two points and pin it to your halfway point on your pillowcase between seams quartering your pillowcase and elastic, now gently pull and your elastic should stretch all round your pillowcase.
 
Switch your sewing machine to a zig zag stitch as we want the stitching to stretch with the elastic, and slowly sew the elastic to your hem , stretch your elastic gently as you go and you will see this gathers your nightdress top.
 
And you have your finished nightdress


An alternative for gathering the top of the nightdress is to make an elastic casing and thread elastic through , but for this example the elastic trim was quicker and I had it to hand .
Don't be put off by the length of this tutorial it took me longer to write it than make the nightdress, if I wasn't stopping to take photos, I could easily have had it done in half an hour , so a great thrifty and quick project.


Tuesday, June 17, 2014

Exciting new handmade creations and custom orders

Recently I have been looking at my Etsy shop again and looking to see where I can improve sales, and after doing this numerous times of doing tis and revamping the conclusion I have come to is I need to offer items that are as individual as the customer that is going to buy them.

I have been looking at new product ranges to give me that usp ( Unique selling point).

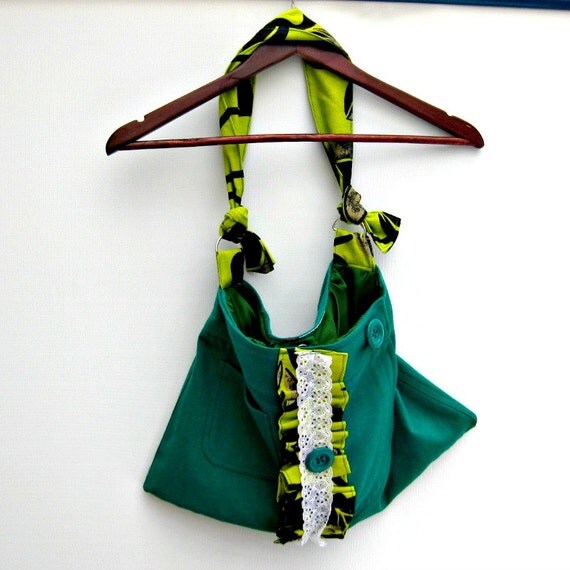
I generally used recycled fabrics to create items such as the bag below, that in itself is a little different but not truly unique


The first of these developments has been sewing patterns, I create my own when creating items for my shop, so partly as a record for me and in order to offer other people the opportunity to have a go at creating lovely items for themselves.

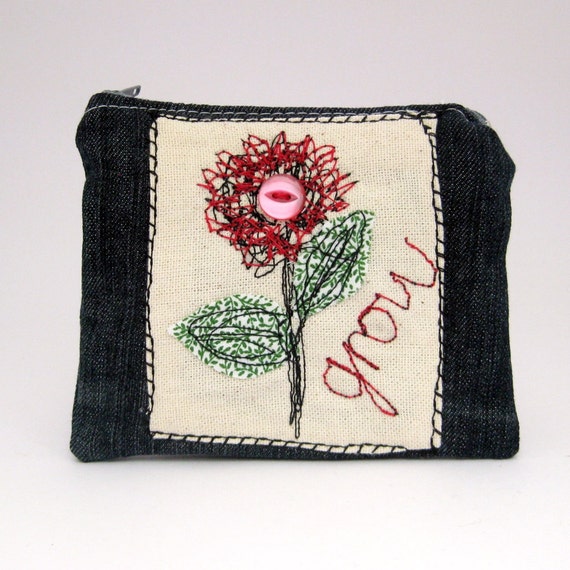
The second development for the shop is free motion embroidery items, now these are unique as I am drawing with the sewing machine, this in itself creates a unique product such as this purse.

Now that is unique enough I hear you say, well for me no, I always want to go that one step further, and thanks to a couple of enquiries regarding a product in my Etsy shop, I have decided to start offering custom orders, the custom orders option is now enabled in my Etsy shop .

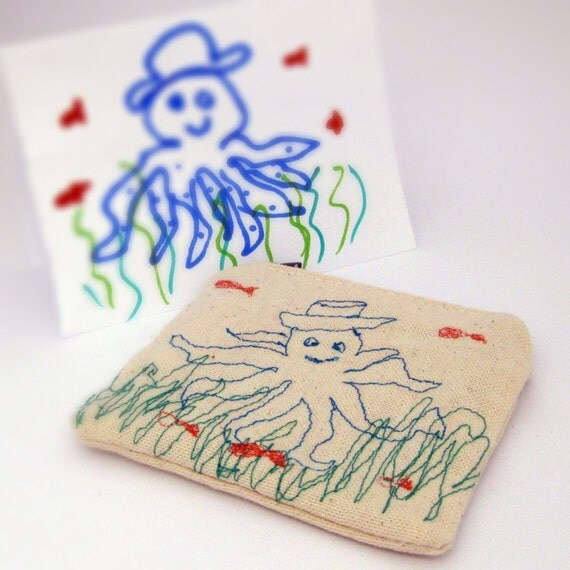
Here is the item that inspired the questions


A free motion embroidered octopus on a zip pouch, the drawing behind it is actually a quick sketch with a Sharpie that I did before embroidering the purse with the octopus design.
The questions I have been asked is can I do an embroidered purse from a child's picture, now this is truly a unique item, so in the next few weeks I will be setting up a custom listing for this purpose in my Etsy shop .
All designs will remain the property of the customer and will not be reproduced or used for advertising purposes without express agreement between you the customer and Martisanne Handmade.


Tuesday, June 03, 2014

A new member of the sewing team

You can see a picture of my sewing/crafting room in the sidebar, but here is a picture of where all the Martisanne Handmade Creations are made just in case you missed it.

Doesn't it look tidy ? , I can assure you at this present moment in time, it certainly does not look like this , sewers and crafty people are messy people it is in our nature , why get one fabric out when you can get out ten and ribbon and buttons and lace to go with it.

You can see the team there on the desk a Janome sewing machine and overlocker, which work just fine.
Recently though I have been doing a lot of free motion embroidery and sometimes finding with some thicker fabrics my Janome has struggled a little it is after all a domestic sewing machine not an industrial.
Another bugbear of mine was swapping from the darning foot to the standard foot, the darning foot is not clip on like the others but screw in, not difficult but when you just want to get on and create an extra step you could just do without.
So to counter these issues , meet the new member of the team "Jones"


Jones is an early birthday present from my husband, the plan is to leave one machine set up for embroidery the other for standard sewing.

It is not my birthday yet but I have been having a play with Jones and after initial hiccups and frustration of not threading him properly due to a lack of manual we are up and running.
I would say by the speed and power that Jones sews,  he is semi industrial , certainly weighs a tonne, I have Googled various Jones sewing machine images and not found one the same, and I cannot find a model number anywhere on the machine, I have looked underneath round the back, down the side , can anyone help me out ?, do you have one of these or have had one of these and know the model number, I would love to hear from you if you do.

Well toodlepip for now Jones and I are off to get up to some creative craftyness

Tuesday, February 18, 2014

DIY photography light box tutorial

Recently I have been working on improving my Etsy shop, designing a new logo, working on tags and descriptions for my products, and the next stop on this journey is improving my photography. I have been reasonably pleased with my Etsy shop photographs , using an old white projection screen and white paper as a base, but was constrained by photo editing and time of day I could photograph , and with a family I need my time to be more fluid.
I researched various photography ideas and came to the conclusion a light box was the way to go, needing one big enough for cosmetic bags and larger and on a miniscule budget , and the need for it to fit nicely in my office, as is usual in the Martisanne household , we researched and decided to come up with our own version, the use of the Ikea table I have to say though was my lovely hubbys idea, whose sole mission in life is to make my life easier wherever possible.

The light box you will end up with following this tutorial will measure approximately 55cms x 55cms x 55cms, and if you follow the principal, you can really make one any size you need.
Firstly let me show you some examples below in the difference a light box will make, the rotary cutter light box photograph was taken at night curtains shut, only standard lighting in the room with a point and shoot digital camera , and just look how good it is.

Photograph_of_purse_in_light_box
And a proper daylight shot below , no editing and no additional light , just taken next to a window on a dreary rainy day.


You see how good a shot you can take without even trying.

For the light box you will need the following

1 x White (matt not gloss finish) Lack Ikea coffee table £5 in the UK 2014.
White fabric , not too thick test it to see if light will shine through, you want fabric that will let light through.
Lighting for your box 1 to 3 angle lamps or torches , you will need to experiment to see what works best.
Roll of Duct tape
1 sheet of white A1 size mounting card , mine was £2.99.

First grab your coffee table and ignore the assembly instructions.

Ikea Lack coffee table


Where the holes are on the underside of the table top drill through to the other side as below, repeat on all four corners.


Drilling coffee table legs
 
You will have four holes on the table top side but that is fine, it will be hidden

drill hole in coffee table
 
Screw the screw pegs in from the white side of the table opposite to what the instructions tell you, on all four corners of the table.

screwing screws in table
 Screw the legs into all four corners of the table top.

scfrew table legs in
 
You will end up with an upside down inside out coffee table.

lack_coffee_table
Now get your fabric, you will need to spread a piece of fabric, leg to leg and tape it to the outside of the table top and leg as below, you want your fabric pulled tight and you want to cover two opposite leg spaces doing this.

photography light box tutorial
 
And you will need to turn your table so that your table top is down flat and the space between all four of your table legs is where your roof will go, making sure you overlap the fabric with your two side pieces slightly to prevent gaps. I also as per the picture below created a fold in the fabric , which when attaching your fabric roof needs to be placed fold down , with the fold in the space between the legs , you can see a bit better in the next picture , the fold is at the front.

fold in roof fabric
 Roof attached to your light box and it is the right way up with the coffee table top down.
light box near completion
 
Next you need to place your A1 sheet of card carefully in your box trying not to crease it , push the short edge in first and place it in the slight fold you made in the roof fabric , to gently wedge it .
Next fold your card gently trying not to crease it, you don't want crease marks, by pushing it backward into the box, you want a gentle curve, so the card is flexed not folded and for the front end of your card to be resting against your table legs on the inside of the box at the front.
I had to cut a little square out of either side of mine probably about 1 1/2 inch x 1 1/2 inch to allow the card to sit around the table legs at the front, this will again wedge it in place.

diy photography light box


And you have a finished light box, place your item inside your box on the card and you can use angle poise lamps above the roof and torches at the sides of the box to create lighting, use what you have available and experiment with your camera.
And the finished light box is also relatively light for moving around, and I intend to use it outside in daylight when it finally stops raining.
 
The photo below used only daylight and a point and shoot digital camera.
 
I hope you enjoyed reading this , and it has given you some ideas to build on


Tuesday, September 17, 2013

What have I been sewing now ?

With the house elves safely settled back into school , I have had a little bit of time this week to get creating for my shop, if you follow me on Twitter you might have noticed me jumping up and down announcing opening a new shop, so there are now two places you can purchase Martisanne handmade goodies, you can click on the tabs at the top of the screen to be transported to my Etsy shop as before, but look there is a new tab for my new shop my Zibbet shop yay twice the handmade fun.

Some of the items available to purchase in My Etsy store are also available to buy in my Zibbet store , but there a couple of new goodies that I have been sewing this week that are only available in my Zibbet store so far .

A few weeks back I purchased a length of gorgeous satin feel balloon print fabric that just screamed celebrations, birthdays, Christmas PARTY TIME !!!
I just couldn't make up my mind what to do with it, but with the school holidays over with I started thinking about Christmas, I know I know but us crafters always have to be one step ahead of you buyers you know.
So I decided to create these little money wallets/gift card holders, a gift card just fits snugly inside , perfect for any gift giving and here they are

Fabric gift card holder
Handmade gift card holders

Gift card wallet
Gift card wallet

You can purchase them in my Zibbet shop

Also around the same time I purchased the balloon fabric, I also bought three beautiful lightweight fabrics in shades of blue and purple, they all looked so
pretty together I bought all three, and have waited as to what to do with them , as I have so many ideas for new designs I couldn't decide what to do with them, to procrastinate or not to procrastinate, so I just got on with it and put them all together in a pretty patchwork cosmetics purses.
The lovely little crochet bonnets on them I had already just waiting for the right project and I think this is it

Cosmetics bag purple patchwork
Available to purchase in my Zibbet shop
Fabric cosmetics bag patchwork
Cosmetics pouch purple patchwork
 
Again this is available to purchase in my Zibbet shop

I am off for more procrastination now perhaps a little sewing thrown in, have a great week and pop back next Tuesday to see what I have been up to.

LinkWithin

Related Posts Plugin for WordPress, Blogger...