Showing posts with label storage. Show all posts

Tuesday, January 21, 2014

Upcycling wooden drawers

A couple of weeks a go I stumbled across a set of wooden drawers that would be perfect for my new sewing supplies, key ring rings, wooden buttons etc. , it was a little gem found in my local recycling shop, for the bargain price of £2.00 , it was just plain and wooden but had a draw missing, apart from that it was perfect.
If you have a local recycling shop it is well worth a visit as their stock frequently changes and you can find some real bargains to use as they are or use as an upcycling project as I have done, I usually try and pop into mine a couple of times a month.
I am sorry but I do not have a picture of the unpainted draws to post on here as I took it with my phone instead of my camera, and it is teeny weeny you can however see them in my Instagram feed here. I post various photos from craft projects and Martisanne Handmade products in the making and finished, along with various random thoughts and ideas , feel free to follow me. If you don't have an Instagram account it is a lot of fun and you can read more about it here .

We undertook the drawer upcycling as a family project with the house elves, we used decoupage paper , but you could cut pics from magazines , and used pva glue to attach the pictures to the wooden drawers, along with some transfers designed for decorating furniture, then it was all clear varnished to seal it.
And this is how it turned out.


I am really pleased with how they turned out , and just as a little insight into me as a person, we could not leave the little drawers as they are as I have an ahem phobia of bare wood, it makes my teeth itch , wooden spoons in particular, I will leave you with that little nugget of information, so now you know if you want to chase me off at a craft fair, chase me with a wooden spoon and you won't see me for dust.


Tuesday, September 24, 2013

How to make a jewellery organiser part two

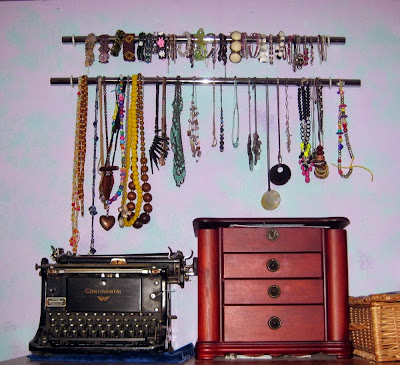
Following on from this post here, we have been making an organizer in the Martisanne household for my many necklaces and bracelets , again I can't take the credit for these, the idea is from this from here
All you will need is a pole or two, I use two hanging rails from an old wardrobe, kept as you never know when they will come in handy to upcycle, and for each pole you will need two hooks , one for each end of the pole , the hooks we used were about £1.50 for a pack of two in our local hardware store.

The hooks we used were a little small so we opened them up to allow the pole to be a little looser fitting resting in the hook.

Screw your hooks into the wall, where you want your pole to go, one at each end, slide your bracelets and necklaces onto the pole(s)and rest your poles on the hooks, and you have a necklace/bracelet holder.


diy jewellery organiser
Diy jewellery organiser


This is a perfect way to store your necklaces and bracelets to keep them tangle free and you can see exactly what you have.

Tuesday, September 03, 2013

How to make a DIY jewellery organiser for next to nothing

Following on from my cherub hunting for the soon to be new theme in the Martisanne bedroom, I have been pondering for a while the problem of my jewellery and this really falls into two parts, I need it displayed so I can easily see what I have and secondly I need it stored in such a way as it does not take up more surface space, so I started googling and came across this awesome idea here so I set about making an earring display myself.
Being a bit of a hoarder it did not take long to source the required items, I had a large pine picture frame that had long since lost it's glass and plenty of leftover chicken wire from making our chicken run, my trusty silver spray paint and every diyers staple a heavy duty staple gun (lame joke I know).

First place your picture frame over your chicken wire and cut your chicken wire just slightly larger than your frame to allow room for stapling, I used wire cutters for cutting the chicken wire.


Jewellery organiser supplies

Now staple your chicken wire to the back of your frame ,using a heavy duty staple gun taking care to ensure the wire is stretched tight and not baggy

Diy jewellery organiser
Staple wire to the frame

Now clip off the excess chicken wire carefully with your wire cutters so that it does not show at the front of your frame

Clipping excess wire from frame

I wanted my jewellery organiser silver so I sprayed it with my silver spray paint

Diy jewellery organiser painting
Painting the diy jewellery organiser

And here you have it , a brilliant way to organise and display your earrings, just hang them off the wire, as I mentioned previously I can't take credit for the idea I originally found it here but wanted to share my making of my own earring display, jewellery organiser.

Finished jewellery organiser


LinkWithin

Related Posts Plugin for WordPress, Blogger...